| Excerpt |
|---|
The Google Trusted Stores program is designed to boost consumer confidence when shopping online. Displaying the GTS badge can assist a business in reaching new customers, as well as improve sales and increase average order size. |


Google Trusted Stores assures the consumer of:
...
- Follow the above links to create Merchant Centre and Google Trusted Store Accounts. Note your account ID for each.
- Login to Google Tag Manager
- Click 'New Tag'.
- Choose 'Google Trusted Stores' as the Product type.


- Configure the Tag as follows (fields not listed here may be left blank):
- Store ID = Your Google Trusted Stores ID
- Locale = must be 'en_AU' (case-sensitive)
- Google Shopping Account ID = Your Merchant Centre ID
- Google Shopping Country = AU
- Trusted Stores Badge Position = Bottom Right or Bottom Left


- Click 'Continue' to set firing rules.
- Click 'All Pages'.
- Click 'Create Exceptions'.


- Select 'Stage Site' from the list of existing triggers (or create if required).


- Click 'Save'.
- Click 'Create Tag' to finish.
...
- Login to CSS as an Administrator.
- Navigate to 'Settings' (/zSettings.aspx).
- Scroll to the 'Google Merchant Settings' section of the General tab.
- Tick the flag to 'Enable Google Trusted Stores'.
- Update the 'Default Shipping Lead Time' = The number of days required to process and ship an order from when it is first submitted.
- This value will be the fallback in cases where the Shipping Lead Time is not set at the warehouse level. It should be an average across all shipping warehouses.
- Update the 'Default Delivery Lead Time' = The number of days required for the carrier to deliver an order to its destination (not including the 'Default Shipping Lead Time').
- This value will be the fallback where an individual freight carrier does not have lead time data entered; it should be an average across all carriers/zones.


- Click 'Update' to save changes.
...
- Navigate to 'Store Locator Maintenance' (/StoreLocatorMaintenance.aspx).
- Click the 'Store Locator' tab. The first Location in the list will display.
- Click 'Modify'.
- Update the 'Shipping Lead Time' = The number of days required to process and ship an order from when it is first submitted.
- This should be a reasonable estimate of how long it takes from receipt of the order to handing goods to the carrier, for this particular warehouse.
- Click 'OK' to save.


Finally, if using Standard Freight, ensure your Charging Zone records include accurate lead times:
- Navigate back to 'Settings' (/zSettings.aspx).
- Click the 'Freight' tab.
- On the Standard Freight tab, select the first Carrier code.
- Click the 'Charging Zones' link.


- With the first Charging Zone record selected, click 'Modify'.
- Update the 'Delivery Lead Time' for this zone. This value will override the 'Default Delivery Lead Time' previously updated in Google Merchant Settings.

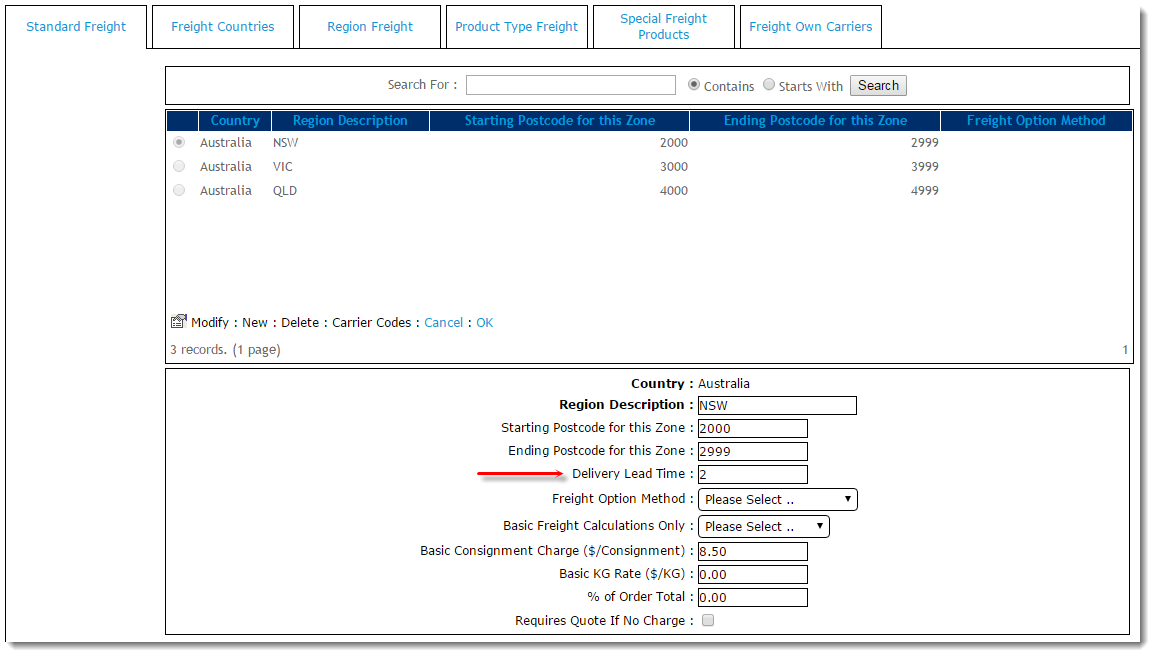
- Click 'OK' to save.
- Repeat for the remaining zones in the list.
- When all zones for this carrier are complete, click 'Carrier Codes' to return to the main carrier table.
- Select the next Carrier Code in the list and click 'Charging Zones'.
- Update lead times for all of this carrier's zones.
- Repeat for all remaining carriers.
...
- Login to Google Trusted Stores
- Select your account from the list of existing Trusted Stores accounts.
- In the 'Shops' table, click 'View' against the relevant website.
- Follow Google's instructions on how to add the required javascript code snippet to your site. Google refers to this process as 'Shop integration'.
- Next, click 'Test' to validate the shop integration code. Google provides instructions on testing and browser requirements.
- Your results should look something like the screenshot below. The warnings are simply optional/extra functionality (click to expand for more information).


- If you have passed all of the browser tests, you are now in Google's qualification period. If any tests have failed, review and correct the issue and re-test.
...