...
| Multiexcerpt |
|---|
| hidden | true |
|---|
| MultiExcerptName | Feature Title |
|---|
|
Enable customers to choose variations of a product from a grid display under one Master rather than searching for and selecting individual product/variant combinations. |
| Multiexcerpt |
|---|
| MultiExcerptName | Feature Overview |
|---|
|
**Overview content**  Image Removed Image Removed
|
| MultiExcerptName | Feature Overview |
|---|
|
How does it work?
To let your customers select multiple variants of a Master product, add a Product Variant Grid Widget to the Product Detail Template or the Product List Item Zoned Template or both. In the format of a grid, all available product variant options such as size and colour are easy to see and select.
 Image Added Image Added
|
Step-by-step guide
You can use the Product Variant Widget in multiple locations. Adding this widget changes what the customer sees.
1. Configure Settings in CMS
- In CMS, go to Settings → Settings → Feature Management → Products & Categories.
- Enable Product Variants and click Configure.
 Image Added
- In Product Variant Settings, enable Allow Product Matrix Mode.
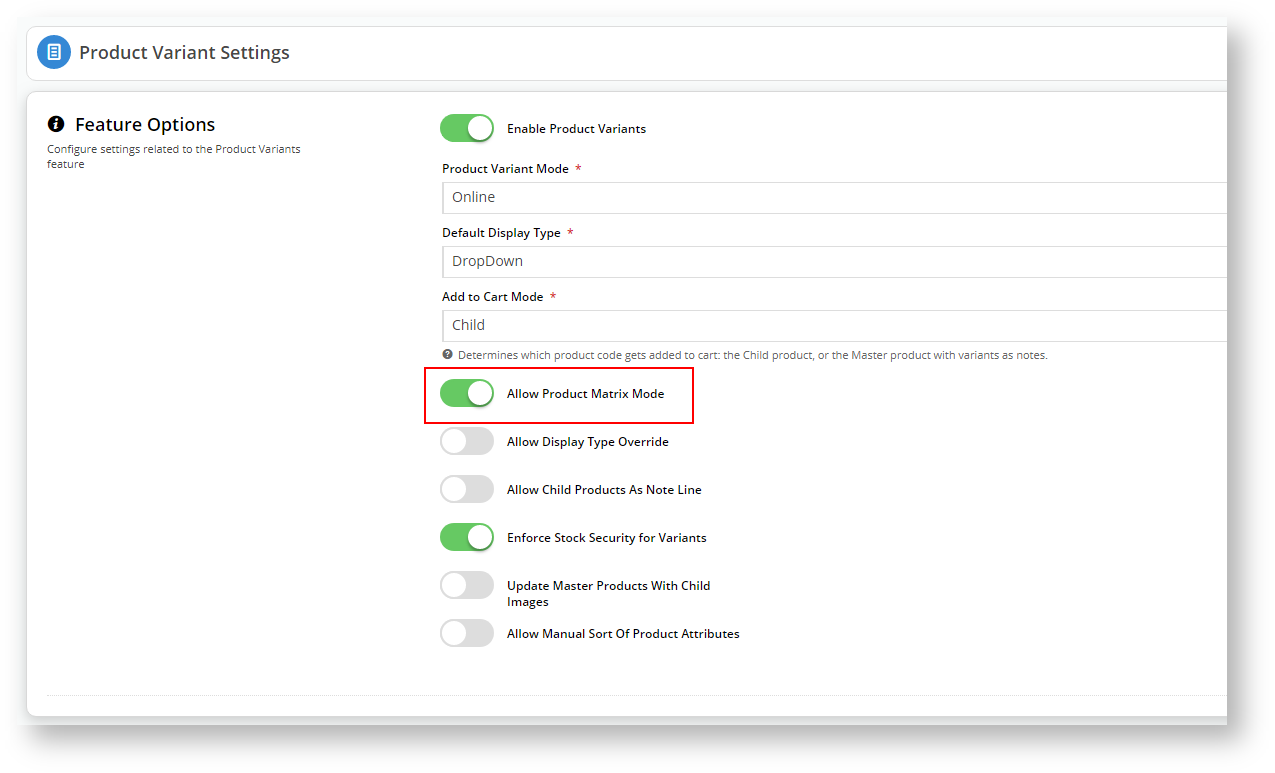 Image Added
- To save the settings and close the window, click Save & Exit.
2. Add Product Variant Grid widget to Product Detail Template
By adding the Product Variant Grid widget to the Product Detail Template, the grid will be displayed when a customer clicks on a Master product.
- Go to Content → Pages & Templates.
- Select Products, then the Product Detail Template.
- Add the Product Variant Grid widget into the same zone as the 'Product Purchase Details' and 'Product Field' widgets. In our example, that is the Zone:MainRight area. To add the widget,
in the zone, click Add Widget and find and select the Product Variant Grid widget.
- Once added, the widget's settings window is displayed. You do not have to configure the fields for the widget to work but we recommend adding a meaningful description in Description. (See help for the Product Variant Grid widget to edit other fields.) We also recommend toggling OFF the Show Heading? button so that the product variant grid displays automatically, encouraging buyers to use this easy selection method.
 Image Added
What does your customer see?
Go to your website.
- Search for your Master product and click on it to open the product detail view. In our example, we are looking at High Visibility Waterproof Safety Trousers.
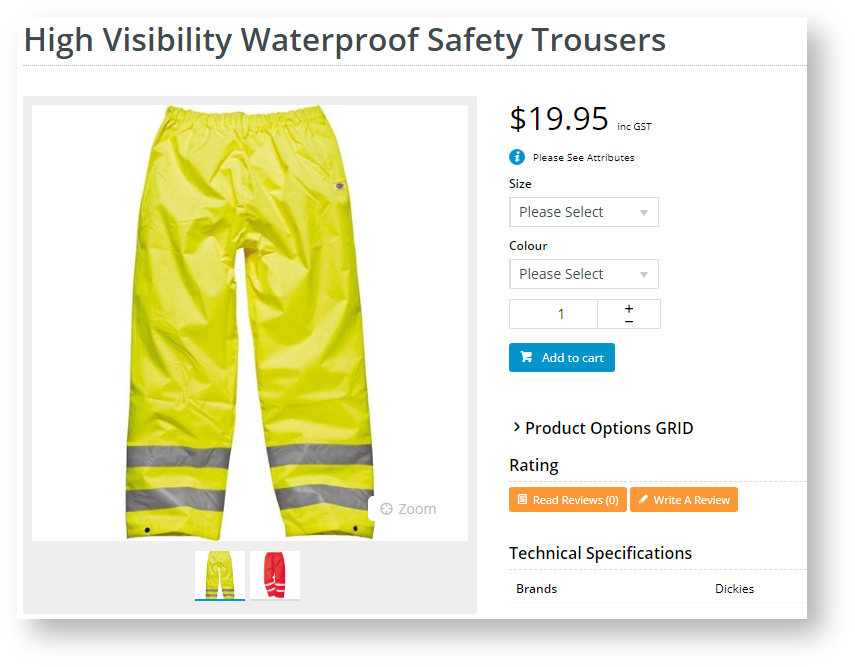 Image Added
- If Show Heading? is ON in the Product Variant Grid widget, then the grid is not automatically displayed. The user has to click on the Heading Text to open it. If Show Heading? is OFF, the grid is automatically displayed.
- If the customer wants to buy a product, they just need to click the + sign next to each variant combination they require or just type in the number they want.
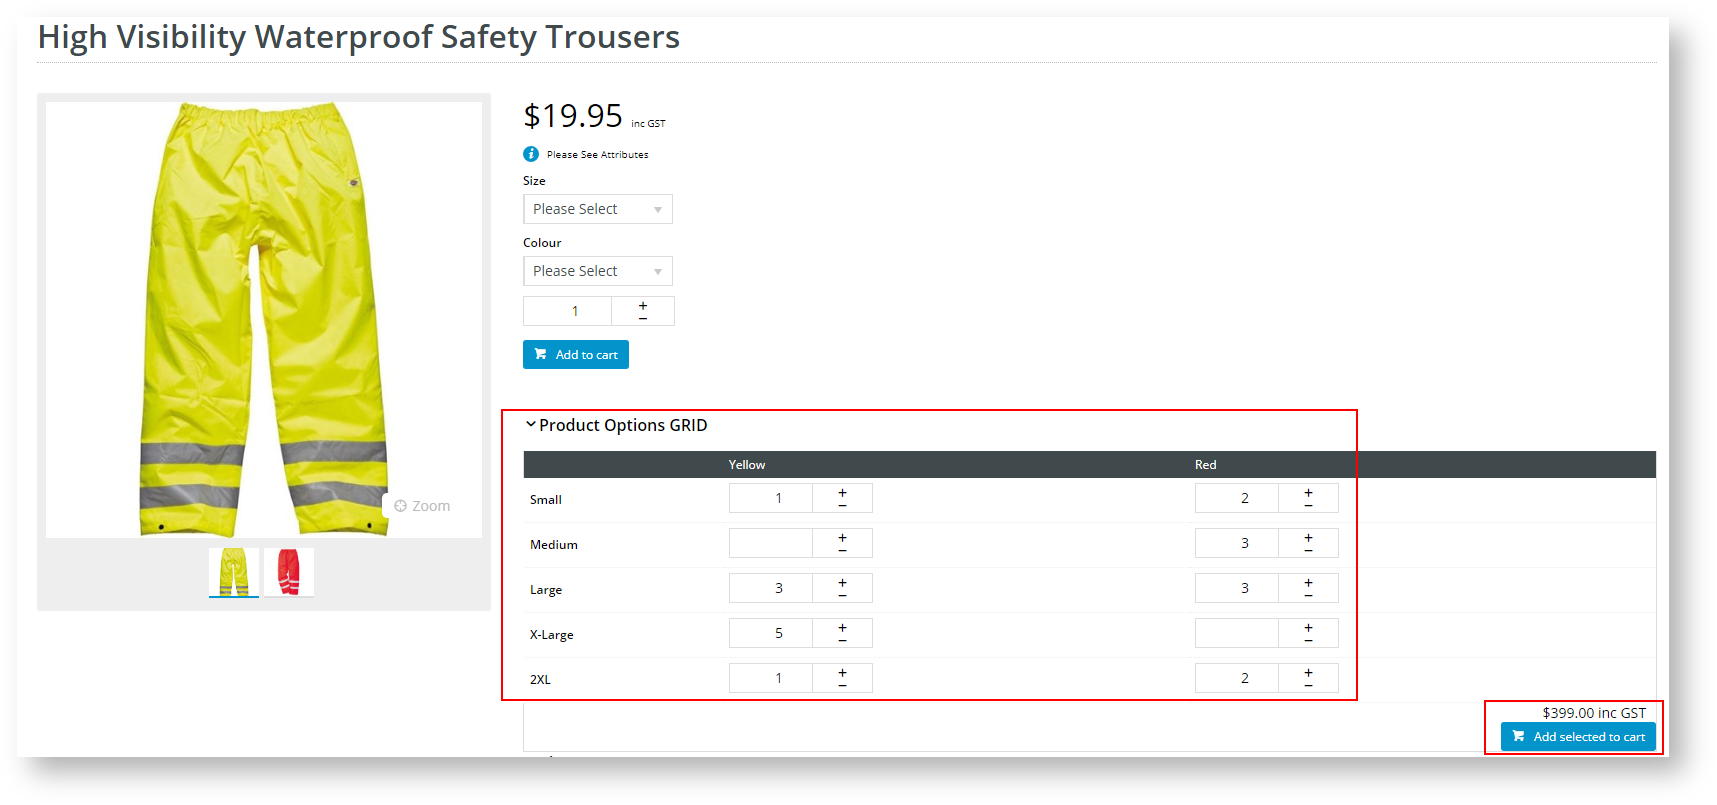 Image Added
- To add the variants to their order, they click Add selected to cart.
Product Variant Grid Widget and the Product List Item Zoned Template
The display your customer will see changes dramatically when you add the Product Variant Grid Widget to the Product List Item Zoned Template.
- Navigate to Content → Pages & Templates
- Select Products.
- Edit the Product List Item Zoned Template.
- Select a zone in which to add the 'Product Variant Grid Widget'. In our example, we added it to the Column2Left zone.
- Add the widget to this zone and edit the fields as needed and save any changes. The widget is now in your Product List Item Zoned Template.
- Click Publish to effect your changes on your website.
What will your customer see?
- In LIST view, your customer can select the product variations and add to their cart all from the search results window.
 Image Added
- In GRID view, the selection is not available as the display allocated to each product in grid mode doesn't leave much room, but it enables your customers to see, at a glance, what variations are available for the product.
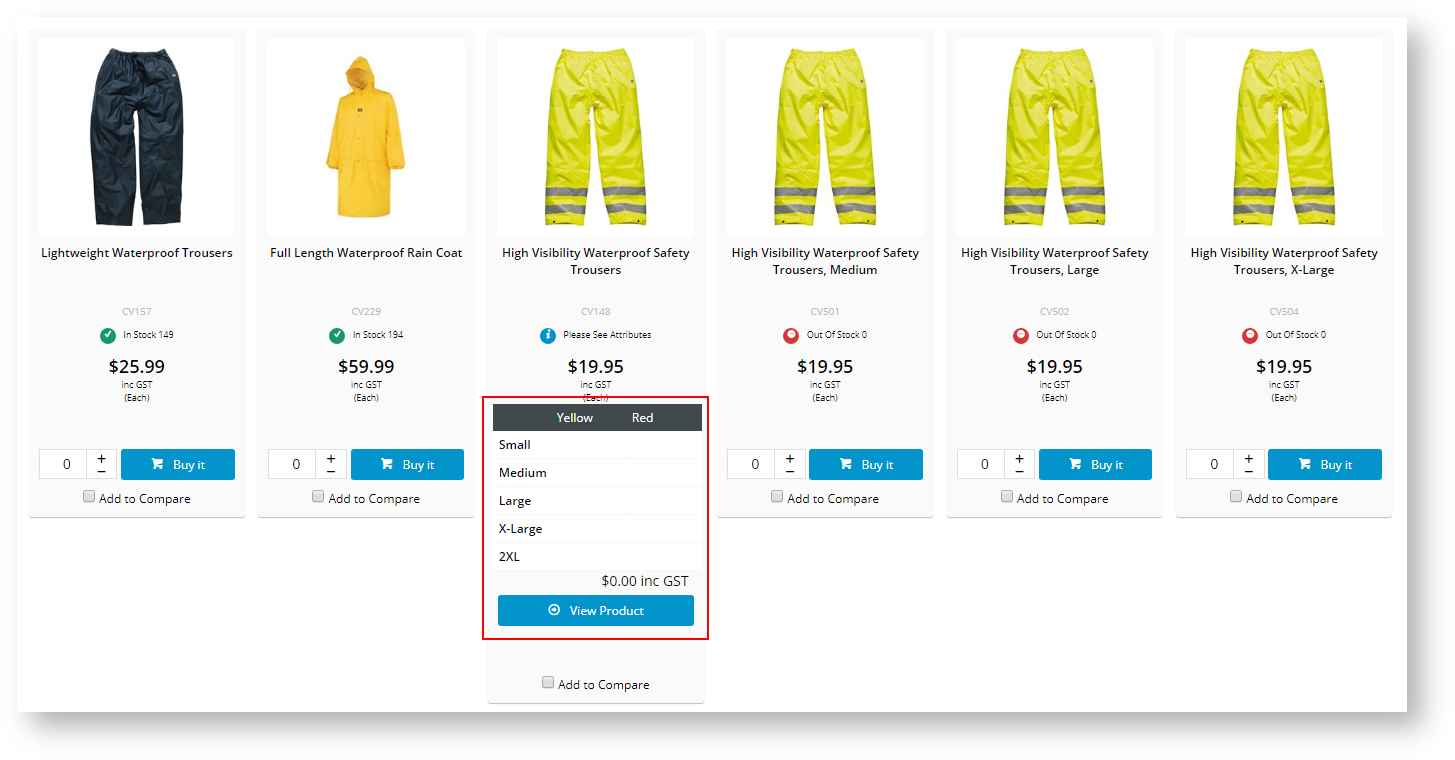 Image Added
Based on the discrepancy in display, you may want to disable the Product Variant Grid from displaying in List and Grid mode and only show when the customer clicks on the product. In this case, DO NOT add the widget to the Product List Item Zoned Template.
Troubleshooting: Not seeing the GRID?
If you have configured the settings for Product Variant Grid but you do not see the GRID in a Master product, follow these steps:
- Navigate to Products & Categories → Product Maintenance.
- Search for your Master Product. In our example, we will search for High Visibility Waterproof Safety Trousers.
 Image Added
- Scroll to the bottom until you locate the Master Product section.
- Ensure Product Matrix Mode is enabled.
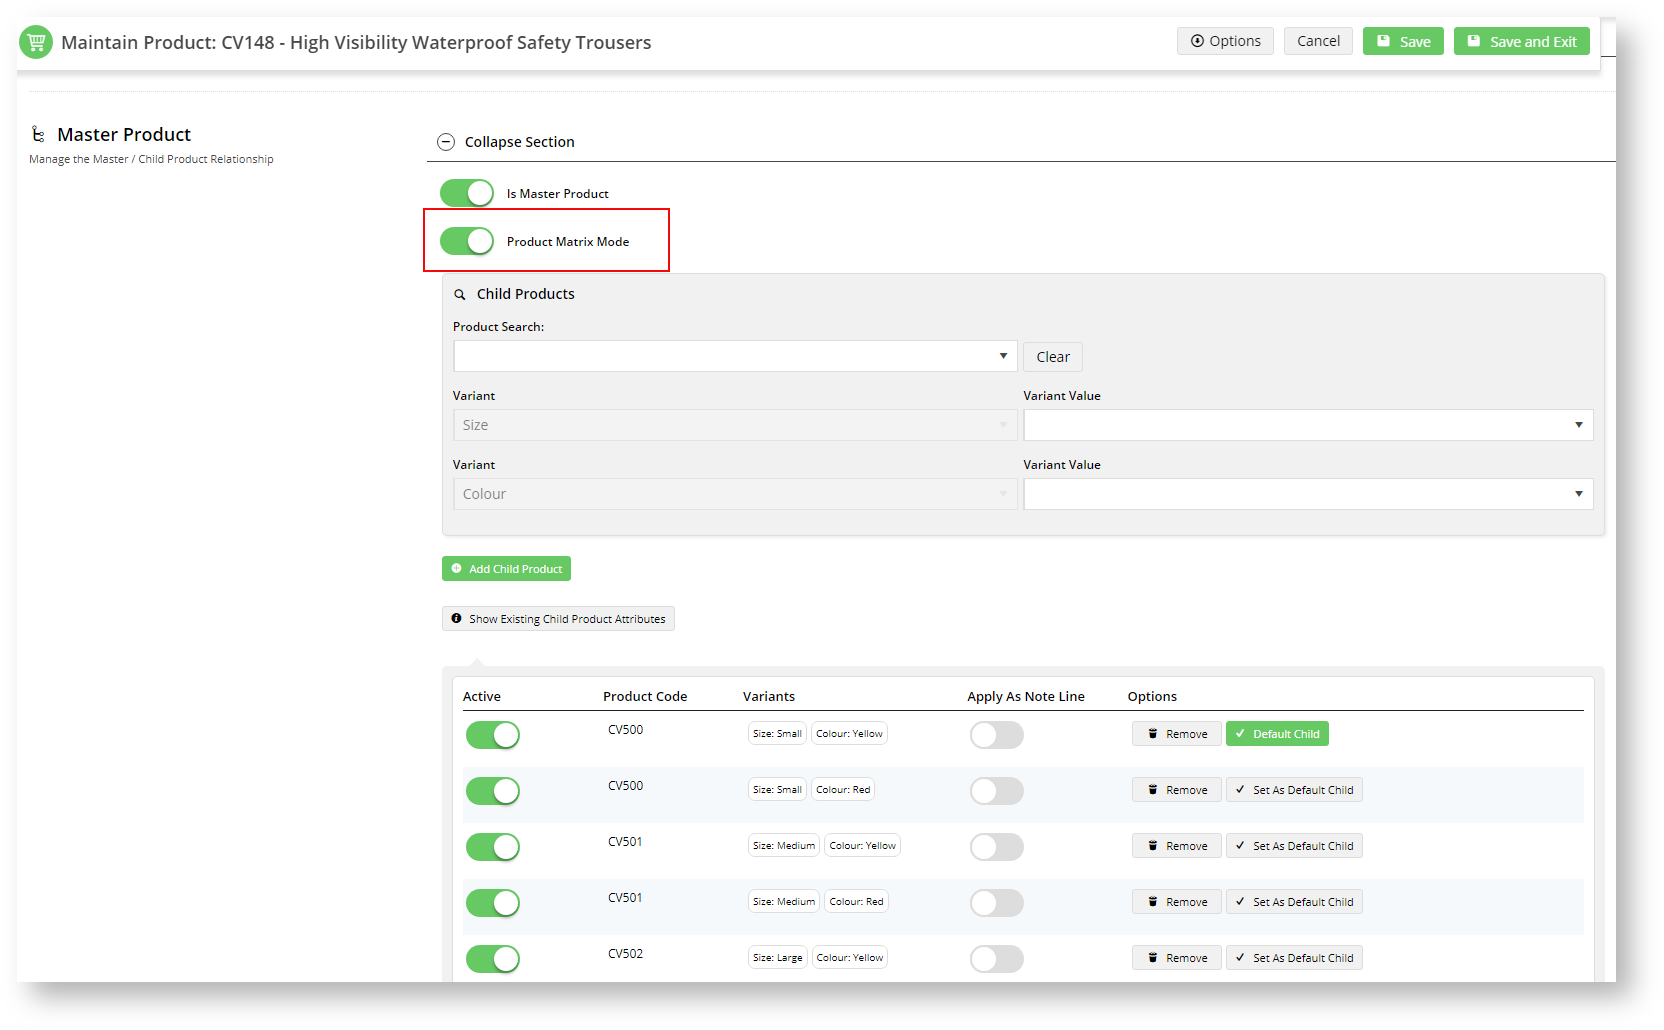 Image Added
- Click Save and Exit
| Info |
|---|
Contact Commerce Vision if you still have problems. |
Additional Information
| Multiexcerpt |
|---|
| MultiExcerptName | Additional Info |
|---|
|
| Info |
|---|
| The Product Variant Grid Widget is best suited to the Product Detail Template. You can choose to add it to the Product List Item Zoned Template, acknowledging that product variant selection is not available when the product search results view is in grid mode. |
|
...
| Minimum Version Requirements |
| Multiexcerpt |
|---|
| MultiExcerptName | Minimum Version Requirements |
|---|
| **4.**13.**00 |
|
|---|
| Prerequisites |
| Multiexcerpt |
|---|
| --Enable "Allow Product Matrix Mode" in Product Variant Settings |
|
|---|
| Self Configurable |
| Multiexcerpt |
|---|
| MultiExcerptName | Self Configurable |
|---|
| Yes / No |
|
|---|
| Business Function |
| Multiexcerpt |
|---|
| MultiExcerptName | Business Function |
|---|
| Marketing Finance IT OPPsProducts & Categories |
|
|---|
| BPD Only? | |
|---|
| B2B/B2C/Both |
| Multiexcerpt |
|---|
| MultiExcerptName | B2B/B2C/Both |
|---|
| B2B / B2C / Both |
| Ballpark Hours From CV (if opting for CV to complete self config component) | | Multiexcerpt |
|---|
| MultiExcerptName | Ballpark Hours From CV (if opting for CV to complete self config component) |
|---|
|
Contact CV Support |
Ballpark Hours From CV (in addition to any self config required)| Multiexcerpt |
|---|
| MultiExcerptName | Ballpark Hours From CV (in addition to any self config required) |
|---|
| Contact CV Support |
|
|---|
| Third Party Costs |
| Multiexcerpt |
|---|
| MultiExcerptName | Third Party Costs |
|---|
| n/a or Fees applyN/A |
|
|---|
| CMS Category |
| Multiexcerpt |
|---|
| MultiExcerptName | CMS Category |
|---|
| CMS Category |
|
|---|
Related articles
| Multiexcerpt |
|---|
| hidden | true |
|---|
| MultiExcerptName | Features List Headers |
|---|
|
Macro Instructions for carrying Article Information through to Feature ListMinimum Version Requirements | BPD ONLY
| Business Function | CMS Category | B2B
B2C BOTH | Feature | Feature Description(Written for our customers and can be pasted into comms sent to them) | Additional info | Pre-Reqs/
Gotchas | Self Configurable | Ballpark Hours
From CV(if opting for CV to complete self config component) | Ballpark Hours
From CV(in addition to any self config required) | Third Party Costs |
|---|
Instructions for carrying Excerpts through from this page to the Feature List Article Page: Add macro / Multiexcerpt (or copy and existing excerpt and edit) or (Copy existing page and place content into existing excerpt macros) On Features List page: Click in the Cell to be populated / add macro / Multiexcerpt Include / Select the Article page and the excerpt (or copy another feature line and edit the 'Article page' source. |
Related help
| Content by Label |
|---|
| showLabels | false |
|---|
| max | 5 |
|---|
| spaces | KB |
|---|
| showSpace | false |
|---|
| sort | modified |
|---|
| reverse | true |
|---|
| type | page |
|---|
| excludeCurrent | true |
|---|
| cql | label = "variants" and type = "page" and space = "KB" |
|---|
| labels | how-to 41300 new |
|---|
|
| Content by Label |
|---|
| showLabels | false |
|---|
| max | 5 |
|---|
| spaces | KB |
|---|
| showSpace | false |
|---|
| sort | modified |
|---|
| reverse | true |
|---|
| type | page |
|---|
| excludeCurrent | true |
|---|
| cql | label = "widget" and type = "page" and space = "KB" and title ~ "variant" |
|---|
| labels | how-to 41300 new |
|---|
|