| Info | ||||
|---|---|---|---|---|
| ||||
|
| Excerpt | ||
|---|---|---|
| ||
Create menus and menu items in the current version of the Section Menu Editor. |
Overview
| Multiexcerpt | ||
|---|---|---|
|
...
...
...
|

...
|

...
...
...
...
...
...
...
This how-to guide helps you create menus and menu items in the current version of the Section Menu Editor.
| Info |
|---|
Creating and editing your content menus are done in Navigation → Section Menu Editor in the CMS. For the current user interface and updated features, you'll need to be running version 4.06 or higher and request that we enable 'Section Menu Editor' for you. We'll examine your current menu data on request of the feature (prior to enabling), to ensure a smooth transition from old to new. Interested? Contact us to get started! |
...
Create a New Menu
- In the CMS,
...
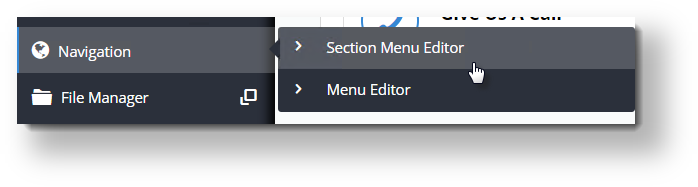
- go to Navigation → Section Menu Editor.
...
- Click Create New Menu.
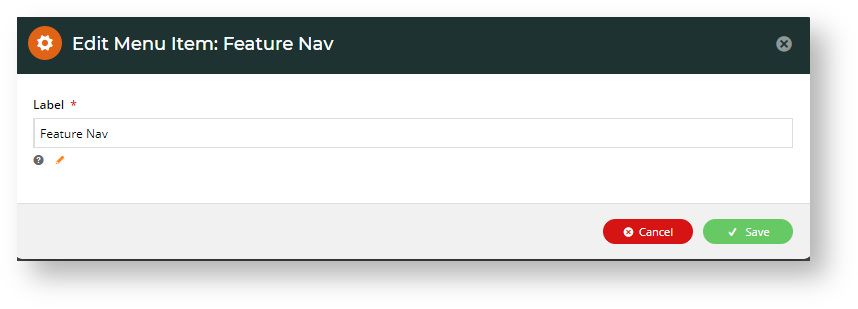
In Label,
...
name your menu
...
. NOTE - This won't be displayed anywhere as it's just a name for internal use.
...
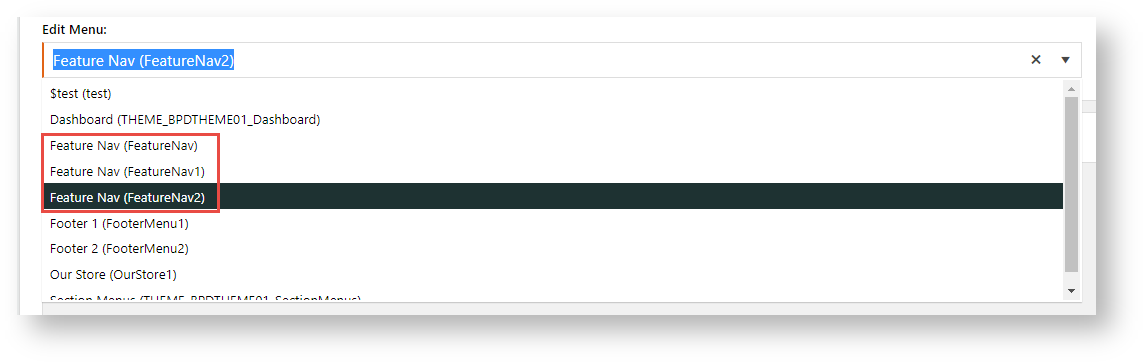
Info Labels already in use can still be duplicated. The system will distinguish same name labels it by adding numbers to identifier codes. Example: 'Feature Nav'
- Click Save. The menu is added to the dropdown list.
- Next, click Add Item To Menu.
- In Label, name the menu item. This

...
- name is displayed on the menu.
...
- (optional) Display an icon
...
- next to the menu item label
...
- . In Icon Name, select
...
- from the dropdown list.
- In Menu Item Type, select the landing page type for the menu item:
- Page to link to:

...
- page -
...
- a page on your site
...
- ; Options - Include in Site Map; Open in New Window, and
...
- Show/
...
- Hide page; Requires Authentication (user must be logged in).
product - a product's details page.
category - a product category page.
campaign- a promotional campaign page. (For versions 4.37+ only)
link - destination page via path entered. Can be external to your site; Options - Include in Site Map; Open a New Window.
- Valid URLs must start with
...
- either http:// or https://
- Javascript code must start with javascript:
...
- Click Save.
...
Repeat steps 5-9 to create
...
more menu items.
Tip After you have created the menu items, you can drag and drop to re-order them if you decide the sequence isn't right.
...
- To save all changes

...
- , click
...
- Save
...
- on the top right corner of the page.
...
Add Access Options to a Menu or Menu Item
...
Configure which Roles can access a menu or an individual menu item.
...
Defaults:
- A new section menu is enabled for all Roles
- Each item in a section menu inherits the role permissions set for the menu.
...
- (But different access
...
- options can be set for individual menu items
...
- .
...
Once you have created a section menu, you can display it on your site. You can do this by (i) using a Section Menu Widget or (ii) including a section menu with your site's Mega Menu.
Both options are covered below.
...
- )
- Next to the menu or menu item, select Options → Associated Roles.
- Toggle ON/OFF for each Role as needed.
- Click Confirm.
- Click Save on the top right corner of the page.


Display a section menu on your site
There are two ways to display a menu:
(i) use a Section Menu Widget, or
(ii) include it on your site's Mega Menu (if used on your site).
(i) Use a Section Menu Widget
A Section Menu widget can be placed...
...
- Go to Content → Page Templates
...
- , then select the template
...
- . (Example: 'Theme Layout' for your site's footer
...
- )
- Scroll to the
...
- right zone and click Add Widget.
- Search for and select Section Menu
...
- Widget, then click Add Widget.
...
- Edit the widget:
In Section Menu Item Code
...
- ,
...
- select
...
- the needed section menu
...
- .
...
- Set other options as needed. See: Section Menu Widget.
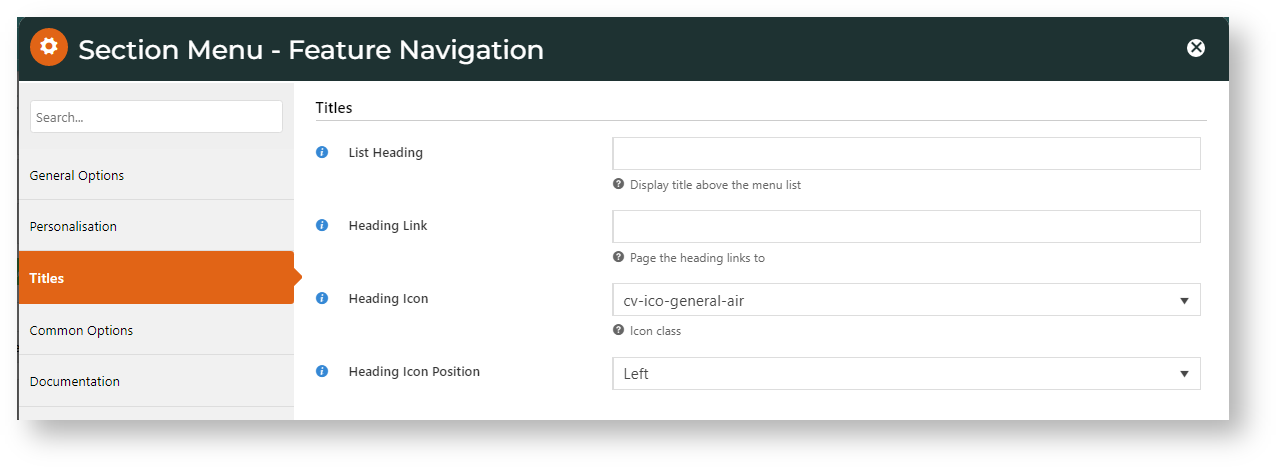
- To display a menu heading above the menu items, select the Titles tab.

...
- In List Heading, enter the heading title
...
- for display.
- If this heading is a link, in Heading Link, add the path to the landing page.
...
- To display an icon
...
- next to the heading, select from
...
- Heading Icon
...
- .
- In Heading Icon Position, select
...
- to display icon left or right of the heading. Default: left.
...
- Click Save. NOTE - To send the menu live immediately, toggle ON Enable widget on Save
...
- before
...
- Save.
(
...
ii)
...
Display a section menu
...
on Mega Menu
...
Only for websites that use a Mega Menu (where
...
top level categories are listed individually,
...
not in one big flyout)
...
.
...
...
Configure the Mega Menu
...
Widget to display a section menu either before or after the product categories.
...

...
- Go to Content → Page Templates.
...
- Select the Theme Layout.
...
- Find the Mega Menu
...
- Widget and click Edit.
- In the menu, select the Section Menu Settings tab.
...

...
- Set options
...
- :
...
- Section Menu Item Code
...
- - select the section menu
...
- .
...
- Section Menu
...
- Append / Prepend to Category Menu? - 'Append'
...
- : show menu after the Category menu
...
- ; 'Prepend': show menu before
...
- Category menu.
...
- Section Menu Heading - add heading for the section menu
...
- . If
...
- lblank, the
...
- first menu item
...
- label displays here.
...
- Section Menu Link - if heading is a link,
...
- enter link details.
...
- Section Menu Icon
...
- - (optional) select
...
- icon.
...
- Section Menu Icon Position - if icon used, select
...
- position
...
- left or right of
...
- heading label.
...
- Section Menu Show Item Icons? - Display menu item icons(selected in 'Section Menu Editor') next to each menu item
...
- ? Default: OFF
- To save
...
- settings,
...
- click Save.
Tip
...
To see your changes
...
on the website, you may need to login / out
...
as the Mega Menu
...
Widget is session cached.
...
See: Cache Refreshing.
Add custom page to a section menu
A custom page must be added to at least one menu when you first configure its settings.
...
This is how to add a page to a section menu
...
.
...
- Go to Content → Page Templates → Custom Pages.
- Select Edit next to the page
...
- .
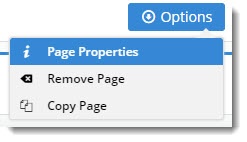
- Hover over Options → Page Properties.
...
- Scroll to the Add to a Menu section. If
...
- menus for this page
...
- exist, they will be listed.
- To add the page to a menu, in Menu Type, select
...
- Section Menu.
- In Menu, select the menu.
- To hide the page from view, toggle ON Hidden.
- Click Add Menu.
Click Save & Exit.
Tip Depending on the menu's location on your site, you may need to refresh the cache

...
to see your page
...
on
...
your website.
Additional Information
| Multiexcerpt | ||
|---|---|---|
| ||
| -- |
| Multiexcerpt | ||||
|---|---|---|---|---|
| ||||
| Minimum Version Requirements |
| |||||
|---|---|---|---|---|---|---|
| Prerequisites |
|
...
| ||||||
| Self Configurable |
| |||||
|---|---|---|---|---|---|---|
| Business Function |
|
...
| ||||||
| BPD Only? |
| |||||
|---|---|---|---|---|---|---|
| B2B/B2C/Both |
|
...
| Multiexcerpt | ||
|---|---|---|
| ||
Contact CV Support |
| Multiexcerpt | ||
|---|---|---|
| ||
0 |
...
| Third Party Costs |
|
|---|
...
| MultiExcerptName | CMS Category |
|---|
...
Related help
| Content by Label | ||||||||
|---|---|---|---|---|---|---|---|---|
|