...
- In CMS, go to Content → Advanced Content → Questionnaire Group Maintenance (/QuestionnaireMaintenance.aspx).
- Click New.
- Set values (fields not listed here can be left blank):
- Questionnaire Code - a unique identifying code for the questionairequestionnaire
- Questionnaire Description - a brief description of the questionnaire
- Spam Validation - tick this box to enable Captcha functionality for anti-spam
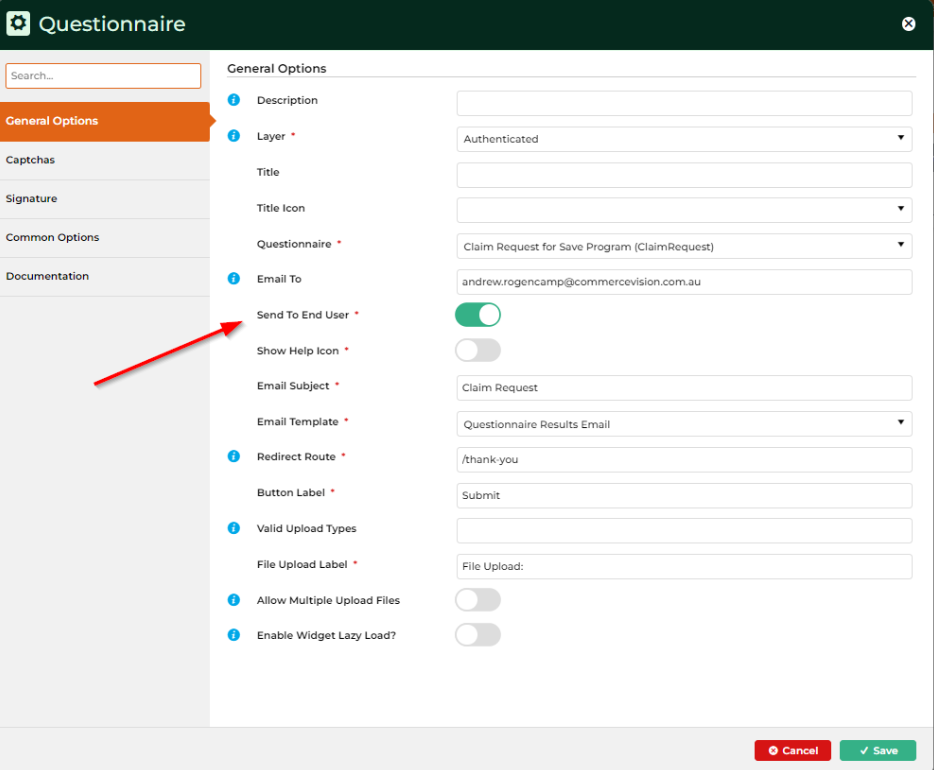
Attachment Upload - tick to allow the user to attach files on submit. (File types specified in Questionaire Widget)
NOTE:
For the 'Send To End User' setting on the questionnaire widget to work (below), you need to define which field, from the Field for users email Address (above) on the questionnaire.
Example: If you setup a questionnaire which has the following fields in it
Email Address, Contact Name, Contact Surname and Phone Number. You would choose Email Address from the Field for users email Address so that the user gets a copy of the form they filled in.
Info
title Digital Signature (Versions 4.37+)
Forms can accept digital signatures. To insert a mandatory Signature input box, tick Requires Signature. Signature field labels can be edited in the Questionaire Widget.
- To save, click OK.


...
- In the Questionnaire selected, click Questions.
- Click New.
- Select a question from the Question Code drop-down.
- Assign a number for ordering of questions on the page.
- Click OK.

- Repeat as needed until all question fields have been added to the questionnaire.
- Click To make sure saved changes appear on your site, click Refresh Dictionary.
Tip If the question you want is not in the Question Code drop-down, create it with these steps:
Questions created here are now available for use in any Questionnaire
- Go to Content → Advanced Content → Questionnaire Field Maintenance (/QuestionMaintenance.aspx).
- Click New.
- Set the values as follows:
- Question Code - a unique code (with no spaces) to easily identify this question for selection later on
- Question Text - the question prompt which will be displayed to the user
- Sequence - determines the order in which the question appears in the maintenance screen. This will default to the next available sequence number, but can be overwritten
- Answer Format - the required format for responses to this question (e.g. Short Text, Number, Tickbox, etc)
If you selected the List, Radio Button or Check List data type:
Lookup: Add a value separated by a semi-colon. Example: Mrs;Ms;Mr;Miss
- Length - the number of characters the field is to be restricted to (if applicable)
- Required - tick this box if this question is to be mandatory
- Help - enter tooltip text here - either a further explanation or example; anything which might assist the user in completing the questionnaire
- Hidden - tick this box if the question should NOT appear on the questionnaire (used to render hidden HTML elements on a questionnaire page)
- Click OK to save.
- To make sure saved changes appear on your site, click Refresh Dictionary.
3. Add the Questionnaire Widget and configure settings
...