How does Scripts & Styles work?
When a custom script or style sheet is created, it is automatically added to the correct system folder and available for selection in a template. To reduce load times, each file is minimised once you click 'Save'. Historical versions of each file are kept, along with an minified once saved.
You can:
- sort all scripts or styles by file name and date last edited.
- view which pages/templates a file is in use.
- view historical versions of a file, and its audit trail of the date/time saved and the user
- .
- use the comparison tool
- to check between two versions of a script or style.
- roll back to a previous version if the current version is not behaving as expected
- .
When you enter the Scripts or Styles screen, all files are listed. At a glance, you can see the number of times a file is in use and its last edited details. Files can be sorted by file name and date last edited.

Once a script or style has been saved, it can be added as a Scripts & Styles widget is available for adding to a page or template. See: Scripts & Styles Widget.

| Panel | |
|---|---|
On this page:
|
Create a script or style
To best explain the functionality, we will make a simple change to the background colour of our Store Locator page.
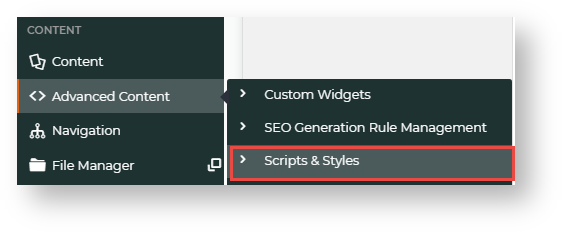
- In your CMS, go to Advanced Content → Scripts & Styles.
- Select Style Sheets. All existing style sheets are displayed.
- Click Add Script/Style at on the top right corner.
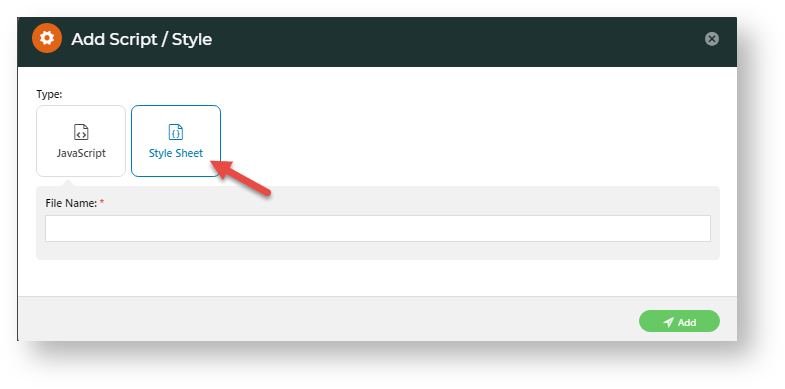
- In Add Script/Style, select Style Sheet.
- In File Name, enter an appropriate name that follows the naming conventions of our site.
- Click Add.
- In the blank editing window, start typing in your custom style sheet. (For a guide to using the Editor, see Code Editor.) Or you can paste text into the Editor.
- When you have finished, click Click Save.
- Click Cancel to exit.


Apply a script or style to a page/template
Now we will apply that style sheet to our Store Locator page (or the Page that you have chosen).
- In your CMS, select go to Content → Pages & Templates
- At the top right of the screen, use Use the Search tool to find 'Store Locator'. NOTE - Your page name may be different.
- Click Edit next to the page/template name.
- Once in In the pagetemplate, click Add Widget.
- In the search field, start typing 'Scripts & Styles' — the system will auto-fill the results.
- Select 'Scripts & Styles' and click Add Widget
.
- The Scripts & Styles Widget automatically opens. In Description, enter a meaningful description for this use. It This will display next to the style name when in use.
- Add a Layer if needed. (See help on adding layers: Layers.)
- In Scripts & Styles, select the style you created, then click Add.
- Click Edit to make some last minute changes to the Style Sheet, otherwise, to apply the script or style, toggle ON Enable widget on Save, then click Save.
The CMS will now show you have applied that Script & Style.- If the Page Preview setting is on, click Publish (top right of the screen).
- Go to your site and open the Store Locator page (or the page to which you made changes).


Compare or revert to an earlier version of a script or style
A The file history of each script and style is maintained. This has a list of lists all versions with the date/time the version was saved and the user who created or edited itsaved dates/times and users. You can also compare versions. If you are 're not happy with the current version, revert to an earlier one.
- In the CMS, go to Advanced Content → Scripts & Styles.
- Click on either the Javascript or Style Sheets tab.
- Click the Edit button next to the script or style.
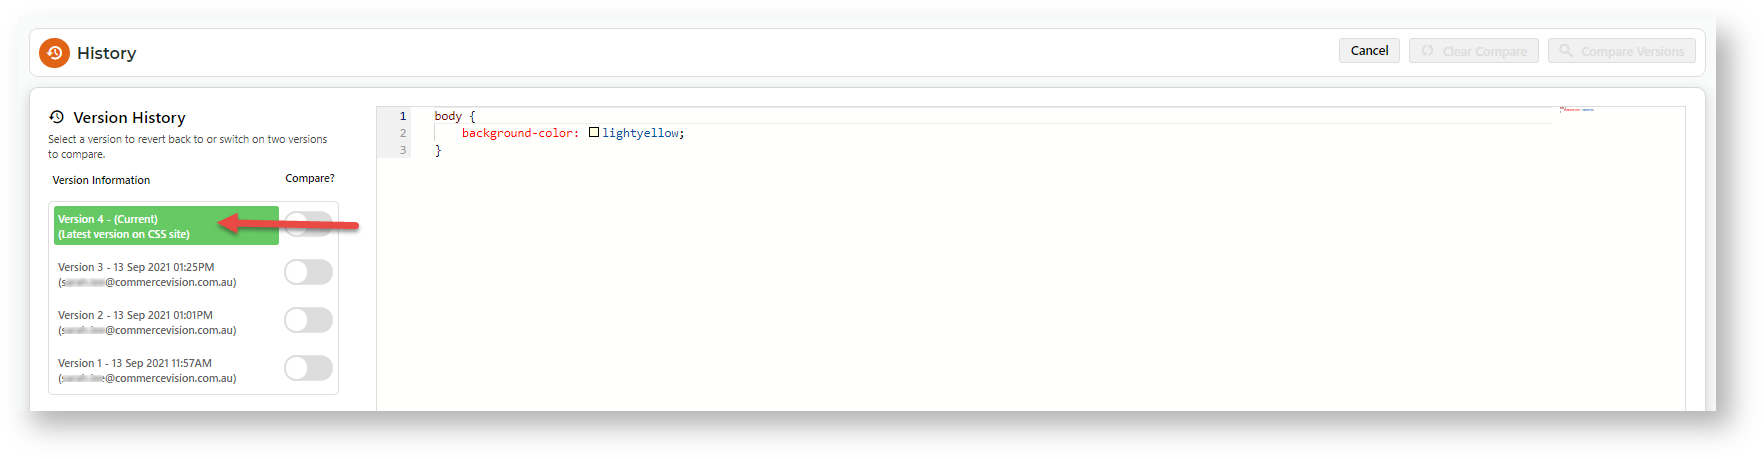
- In the 'Edit' page, hover on Options, then click File History.
- Along with the current version, any previous ones The current and previous versions are listed. To view a previous version, click on it.
- To compare two versions, in the Compare? column, toggle ON the two versions, then click Compare Version.
- The two versions are displayed side by side with changes Changes are highlighted. When you've finished viewing, click Clear Compare.
- To use an earlier a previous version, click on the versionit, then click the Restore this version button.
- To confirm, click Save. The earlier previous version will be is copied and and saved as the latest version.


Delete a script or style
| Info |
|---|
Deleting non-system scripts and styles in the CMS is available from 4.17+. NOTE - Scripts and styles currently used on a page or template cannot be deleted. They have to be removed from templates first. |
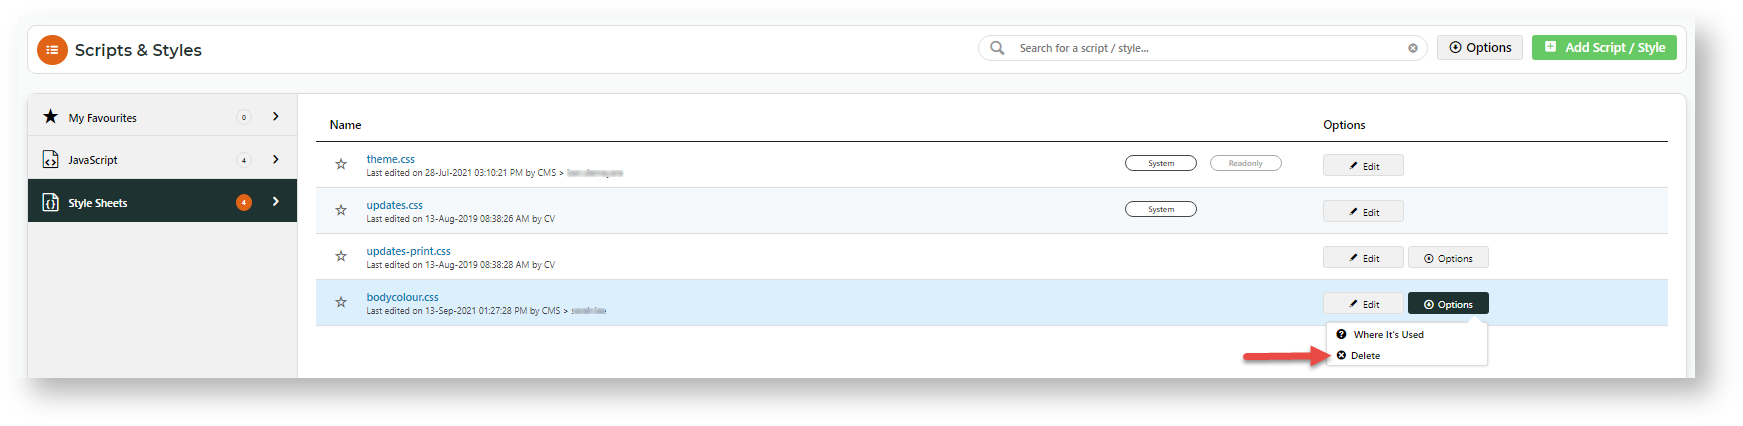
- In the CMS, go to Advanced Content → Scripts & Styles.
- Click on the Javascript or Style Sheets tab.
- User-created files will have both 'Edit' and 'Option' buttons. To delete the file, hover over its Options button, then click Delete. NOTE - System files have cannot be deleted.
- In the delete confirmation popup, click OK.
Check where a script or style is in use
- In the CMS, go to Advanced Content → Scripts & Styles.
- Click on the Javascript or Style Sheets tab.
- Find the file name, hover over its Options button, then click Where It's Used.
- The templates currently using the script or style are shown.


Minify Scripts and Styles
To improve the load time of web pages on your website, existing files can be minified.
- Go to Advanced Content → Scripts & Styles.
- Hover over the Options button, then click Minify All Files.
- In the popup, confirm you want the files minified.

Additional Information
| Minimum Version Requirements |
| |||||
|---|---|---|---|---|---|---|
| Prerequisites |
| |||||
| Self Configurable |
| |||||
| Business Function |
| |||||
| BPD Only? |
| |||||
| B2B/B2C/Both |
| |||||
| Third Party Costs |
|
| Multiexcerpt | |||||||||||||
|---|---|---|---|---|---|---|---|---|---|---|---|---|---|
| |||||||||||||
Macro Instructions for carrying Article Information through to Feature List
Instructions for carrying Excerpts through from this page to the Feature List Article Page: Add macro / Multiexcerpt (or copy and existing excerpt and edit) or (Copy existing page and place content into existing excerpt macros) On Features List page: Click in the Cell to be populated / add macro / Multiexcerpt Include / Select the Article page and the excerpt (or copy another feature line and edit the 'Article page' source. |
Related help
| Content by Label | ||||||||||||||||||||
|---|---|---|---|---|---|---|---|---|---|---|---|---|---|---|---|---|---|---|---|---|
|