...
Product Document & Video Import allows you to do just that. You can also upload linked to YouTube or Vimeo embedded videos for a product. Video links are displayed in the product gallery.


Step-by-step guide
...
- If your document file(s) haven't already been uploaded to the CMS, do that first.
Go to File Manager, select the Documents folder and navigate to the correct sub-folder if required. Click Upload, browse to your document(s) and select to upload.- Next, get your CSV file ready. You can download an example template on the import page, or there's also one here - product-document-example.csv.
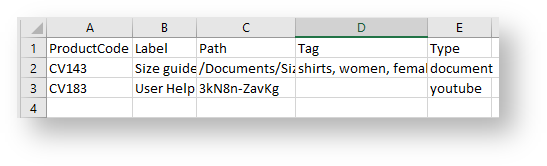
- Check your CSV file has 5 columns:
Column A - ProductCode: This is the product code you're editing documents for in this import.
Column B - Label: This is the label text the user will click on to access the document. Example: "Size guide"
Column C - Path: This is the path to the document on your website. You need the folder path + file name. Example: "/Documents/Size-Guide-Womens.pdf". For a video, just enter the video ID, e.g., 3kN8n-ZavKg
Column D - Tag: This should be any tag(s) you want to associate with this product and file combination. You can use tags as a filtering device in the Product Documents widget on your product page.
Column E- Type: This is the file type: document, vimeo or YouTube.
If you have more than one tag for a product document, separate each one with a comma. Example: shirts, womens- Save your file in .csv format.
- In the CMS, navigate to Products & Categories → Product Document & Video Import.
- In Default Media Type, enter the default media type for this download.
In the Default Tag dropdown, you can select one of your existing tags to use for this import.
Warning If you choose not to nominate a default, you'll need to make sure the 'Tag' column is populated for every item on your spreadsheet.
Select the Import Type you're after:
Append - Adds documents to the products on the CSV file, but does not affect existing product docs IMPORTANT- make sure there are no duplicate lines in the CSV file or that the product does not already have this file as this will result in duplicate document links in the product's page.
Overwrite - Replaces existing documents on products in the file with the new documents specified. It will only do this where the tag on the existing document matches what is on your CSV file (or the default tag if none is specified on the spreadsheet). NOTE - Duplicate lines will be skipped and noted in the Import Log. We will not cancel the import.
Delete - Removes all existing specified documents. Here you can choose to delete by tag (where there is a match), or by file path (where there is a match)- Click 'Select files' to browse to your saved CSV. Once you select the file, the import will begin automatically.
- Once complete, the Import Log will show the results of your import, and whether any errors were encountered.


...