1. Configure a freight country
To configure a freight country:
- In the CMS, navigate to Settings → Settings (/zSettings.aspx).
- Select the Freight tab.
- Scroll down and select the Freight Countries tab.
- To enter a new record, scroll down and click New.
- Enter values in the fields as required.
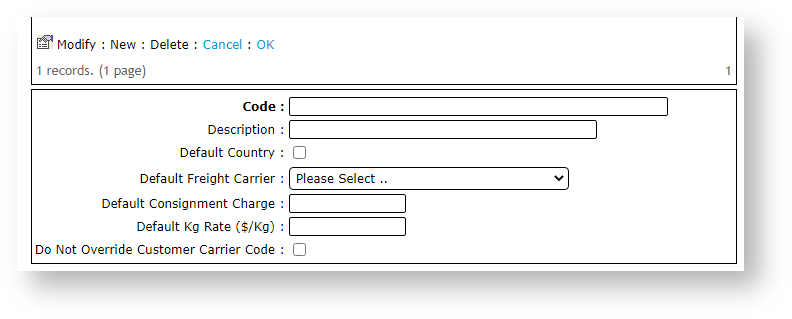
Freight Countries
Field Value Code A unique code/value for the country Description A short description / country name Default Country Tick if this country is the default country for freight calculations Default Freight Carrier The default carrier for the country. Available carriers will be populated from Carriers entered in 'Standard Freight'. Default Consignment Charge A default charge for the country. It can be overridden at a Carrier charging zone level. Default Kg Rate ($/Kg) A default $/KG charge rate. It can be overridden at a Carrier Charging zone level. Do Not Override Customer Carrier Code When ticked ('Yes'), the system uses the carrier code from Customer 'Delivery Code' (dr-delivery-route-code) in the ERP/PRONTO, but will still calculate the charges based on this freight option. - To save this country, click OK.
- To add another country, repeat Steps 4-6.


2. Configure a Freight Option
- In the CMS, navigate to Settings → Settings (/zSettings.aspx).
- Select the Freight tab.
- Scroll down to the Standard Freight tab.
- To enter a new carrier, click New.
Enter values in the fields as required.
For per kilogram charges, it is essential to have weight data populated in the PRONTO Stock Master. This is also important for carriers with physical restrictions on consignment sizes or dimensions.
Field Value Code A unique value that corresponds to the Carrier Code in the ERP/PRONTO. As such, only the first four characters are read (although the value can be longer if required for differentiation). Description A short description of this freight option, displayed to the end user during Checkout. Carrier Restricted to Delivery Methods Minimum Freight Charge The minimum charge for this freight option. The Base Charge + $/KG charge in the Charging Zone screen is calculated and compared to this Minimum Freight Charge. The system will apply the greater of the two charges. Packaging Charge ($/Kg) An additional charge applied to this carrier, per KG. Minimum Carrier Weight (Kg) Minimum order weight in KG. This value is used to filter carrier options based on weight ranges. Maximum Carrier Weight (Kg) Maximum order weight in KG. This value is used to filter carrier options based on weight ranges. Maximum Volume (cubic metres) Maximum order size in cubic meters. Value is derived from the 'Pack Cubic Size' for each product. Order Limit for No Charge The value the order must reach in order to qualify for Free Freight. Value is inclusive of GST. Order Value Start Range Minimum order value (inc-GST). This value is used to filter carrier options based on total spend. Order Value End Range Maximum order value (inc-GST). This value is used to filter carrier options based on total spend. Do Not Override Customer Carrier Code When set to 'Yes', the system uses the carrier code from Customer 'Delivery
Code' (dr-delivery-route-code) in PRONTO, but will still calculate the charges based on this freight option.Maximum Carrier Item Length Maximum length for ANY product on the order, expressed in metres. This field is mapped to 'ItemLength' in the Product table, but the value is not maintained in the ERP/PRONTO. (Contact Commerce Vision for information on how to use this field.) Volume to Weight Conversion Factor System multiplies the total order volume (using 'Pack Cubic Size' for each product) by this Volume to Weight Conversion Factor. If this value is greater than the current total order weight (using 'Pack Weight' for each product), it will be used as the order weight.
This field is not used if left blank.Track and Trace URL The Carrier's order tracking URL with the consignment note expressed as a parameter.
For a list of common URLs, see: https://help.commercevision.com.au/hc/en-us/articles/201395495
Delivery Instructions
This text is inserted into the first line of Delivery Instructions for this carrier. Cannot be edited by the end user.
30 character limit (as per PRONTO field).
Dangerous Goods Surcharge Method Select: None, Percentage or Flatrate. Dangerous Goods Surcharge Value For use when Percentage or Flatrate selected.
Enter % or an amount.
Dangerous Goods Charge Type If in use, the charge type should match that in your ERP. Tailgate Surcharge Method None or Flatrate Tailgate Surcharge Value If Flatrate used, enter the amount. Tailgate Charge Type If in use, the charge type should match that in your ERP. Same Day Delivery Check Availability Tick to offer same day delivery.
Note: It is recommended that same day shipping is set up as a separate freight option.
Same Day Delivery Warehouse Enter the Warehouse Code that same day shipments come from Same Day Delivery Start Time Enter the valid start time for same day delivery, e.g. '12:00 AM' Same Day Delivery End Time Enter the valid end time for same day delivery, e.g., 02:00 PM' Track and Trace Only Track and Trace only is used To save this carrier, click OK.


3. Configure a Charging Zone
NOTE - Before adding or editing Charging Zones for a carrier, ensure the required data on the Freight Countries tab have been entered.
- For the carrier you wish to add a charging zone, click on its radio button.
- Click Charging Zones.
- To create a new zone, click New.
Enter values in the fields as required.
Field Value Country* Country name for this carrier option. The values in this drop-down list are populated from the data on the 'Freight Countries' tab. Region Description* A short description of the region or zone. Starting Postcode for this Zone* The starting postcode (e.g. 4000 if this zone is all of Queensland). Ending Postcode for this Zone The ending postcode (e.g. 4999 if this zone is all of Queensland). Delivery Lead Time The number of days required for delivery from the warehouse to the destination. This value overrides the system setting default and does not include the Shipping Lead Time (also in system settings). Freight Option Method The method by which charges are calculated for this zone. Either $/KG or as a % of Order Total. Basic Freight Calculations Only If set to 'Yes', the system only charges the value entered in the 'Basic Consignment
Charge ($/Consignment)' field. The $/KG rate will not be added.Basic Consignment Charge ($/Consignment) The base charge amount which applies to this zone. Basic KG Rate ($/KG) The dollar per KG rate which applies to the order. This may be used on its own or added to the 'Basic Consignment Charge'.
NOTE - This value must be blank if '% of Order Total' is in use.
% of Order Total The percentage of the total order value that applies to the order as a freight charge. This may be used on its own or added to the 'Basic Consignment Charge'.
NOTE - This value must be blank if 'Basic KG Rate ($/KG)' is in use.
Requires Quote If No Charge (Versions 3.82+) When no freight options are found, the order is integrated to the ERP as normal to commit stock, but no payment is taken (as freight charges will generally be added manually later).
NOTE - Requires the System flag 'Enable Freight Quotes For Bulky Item Orders' to be turned on in order to work.
Suburb One or more suburbs, if applicable. - To save the charging zone, click OK.
- To add another zone, repeat Steps 13-15.


Special Freight Products
It is also possible to configure a fixed charge for a particular product. In this scenario, the product with a fixed charge is excluded from the normal freight calculations, instead attracting the special charge entered on the 'Special Freight Products' tab.
NOTE - In order to use Special Freight Products:
- In the CMS, navigate to Settings → Settings. (/zSettings.aspx)
- Under the General tab, tick Enable Special Freight Products Checks.

- To save, click Update.
In the screenshot below, product CV100 incurs a $50.00 (inc-GST) freight charge.

Related help