Overview
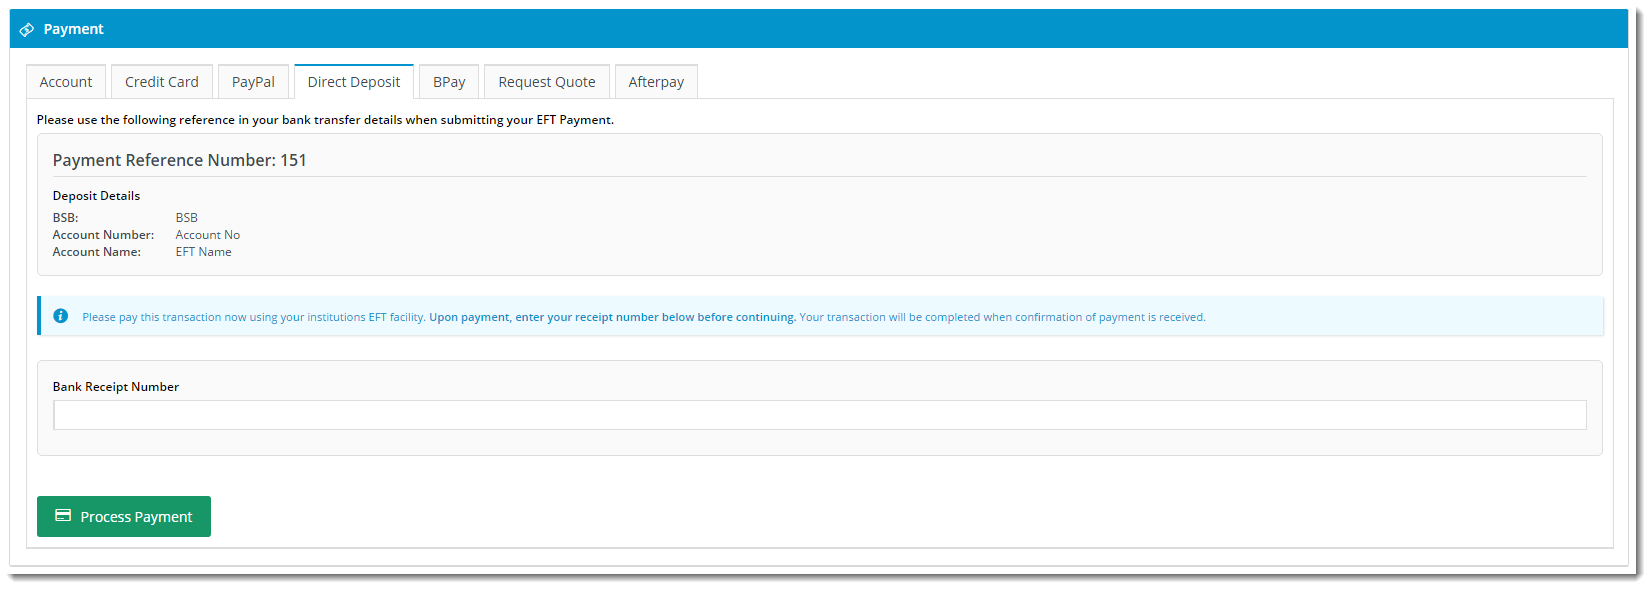
Direct Deposit or Electronic Funds Transfer (EFT) is a commonly accepted form of payment online, especially for B2B customers. Use this guide to configure your CV ecommerce site to accept EFT payments from online users.
- Enable EFT Payments at the System level.
- Add the 'Release Payments' page to the CMS 'Other' menu.
- Customise the EFT Email template
Step-by-step guide
1. Enable and Configure EFT Payments at the System level:
- Login to the CMS.
- Navigate to 'Settings' --> 'Settings'.
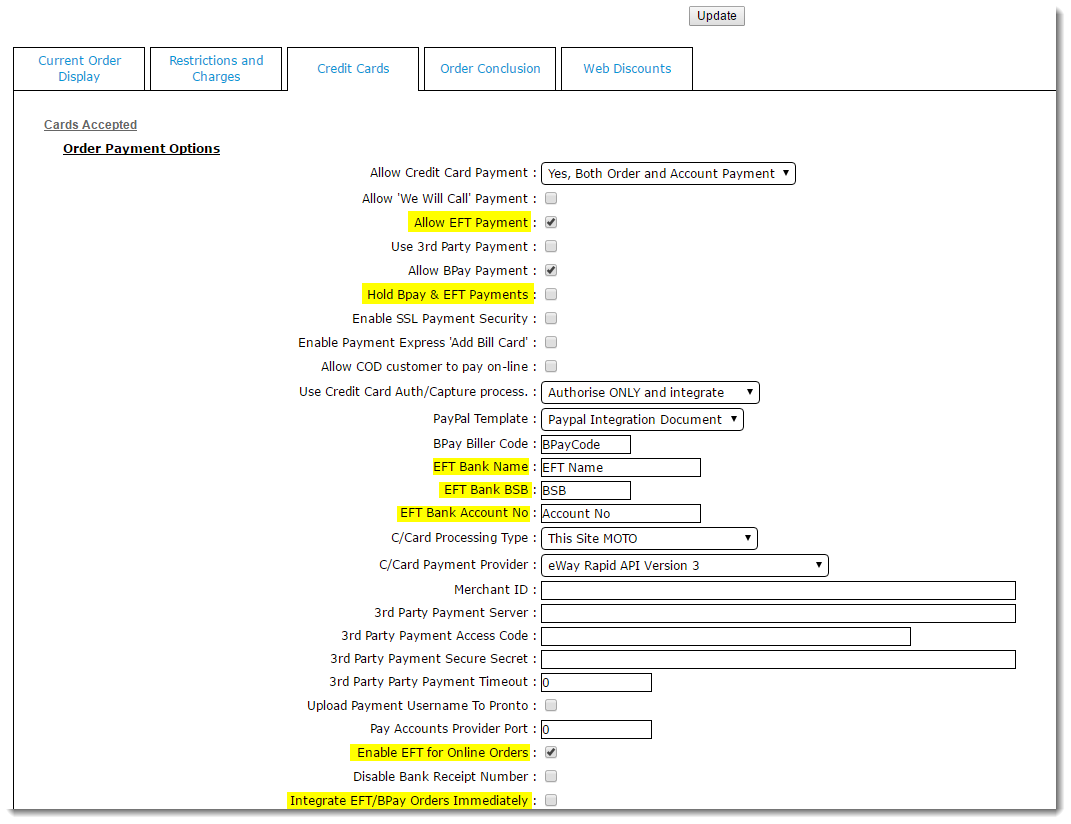
- Select the 'Orders' tab.
- Select the 'Credit Cards' tab.
- Tick 'Allow EFT Payment'.
- Tick the 'Hold Bpay & EFT Payment' setting if required.
- Holding EFT payments ensures a Cash Receipt is not created until the payment is released in the 'Release Payments' screen (see How to release EFT and BPAY Payments for instructions).
- Populate EFT Bank Details:
- EFT Bank Name
- EFT Bank BSB
- EFT Bank Account No
- Tick 'Enable EFT for Online Orders' (unless EFT should be accepted for Account Payments only).
- Tick 'Integrate EFT/BPAY Orders Immediately' if required.
- This enables EFT orders to integrate to PRONTO immediately, rather than being held online until the payment is released via 'Release Payments'.
- Click 'Update' to save changes.
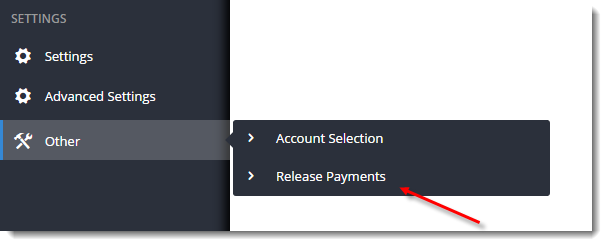
2. Add the 'Release Payments' page to the CMS 'Other' menu.
- In the CMS, navigate to 'Advanced Content' --> 'Resources'.
- In Resource Maintenance, search for 'adminpage' - this should return 'rcCssAdminPageAdditions'.
- Click 'Modify'.
- Enter 'ReleaseCustPayments.aspx' in the Resource Value (if there are values already present, separate them with a comma).
- Click 'OK' to save.
- The 'Release Payments' page will now show in the 'Other' menu of the CMS.
TIP
If the Release Payments page does not appear in your 'Other' menu after following these steps, it may not exist in your Administrator menu (CSSADMIN).
You will need to add 'ReleaseCustPayments.aspx' to your Admin menu so the CMS can access it. See Add a New Menu Item for instructions.


3. Customise the EFT Payment Email:
- In the CMS, navigate to 'Content' --> 'Emails'.
- Select the 'EFT Payment Detail Email' template.
- Click 'Edit' on the EFT Payment Detail widget.
- Update instruction text and other email content as required. Widget documentation can be found here - EFT Payment Detail Widget.

- Test output using the 'Test Email' button in the template.

Optional Settings
It may be desirable to deny EFT access to certain roles, leaving them with credit card payment options only. Similarly, a particular role can be configured to use different EFT payment details from the system default.
Keep in mind that Role settings will override the System settings.
To Update Role Level EFT Settings:
- In the CMS, navigate to 'Users' --> 'Roles'.
- Select the required role via radio button.
- Select the 'Functions' tab.
- Click 'Modify'.
- Update the role-based EFT options as required:
- EFT Role Payment Mode:
- Enable role-based EFT - enables EFT payments for the role, utilising the role-level EFT settings (overriding system settings).
- Deny EFT to users in this Role - excludes users in this role from accessing EFT payment functionality, even if it is enabled at the System level.
- EFT Payment Instructions Template - n/a for BPD sites - leave blank.
- EFT Bank Details Resource Code - the Resource Code for the system resource containing the format string used to render EFT bank details for this role.
- EFT Bank Name
- EFT Bank BSB
- EFT Bank Account No
- Click 'OK' to save.

Not using BPD and the CMS? Find instructions for our classic sites here - EFT Payments (classic sites).
Related help