This feature must be enabled for your site by Commerce Vision. Once it has been enabled, you can edit display options.
Overview
The delivery date of an order is typically determined by the business but is assumed to be ASAP ('As Soon As Possible'). You can add a section to the Checkout page to allow logged in users to specify a preferred future delivery date instead. If this section appears, the user has to choose between ASAP and entering a preferred date.
On this page:
Step-by-step guide
For the Preferred Delivery Date section to display, add the Forward Orders Widget to the Checkout template. Most label and display options for this section can be edited in the widget.
Because of the complexity of functions and options on the Checkout page, there are a few other configuration steps as well. NOTE - One or more of these may have been done for your site by Commerce Vision.
1. Add the Forward Orders Widget
The Foward Orders Widget renders the Preferred Delivery Date section.
- In the CMS, navigate to Content → Pages & Templates → Checkout.
- Click Edit for the Checkout template.
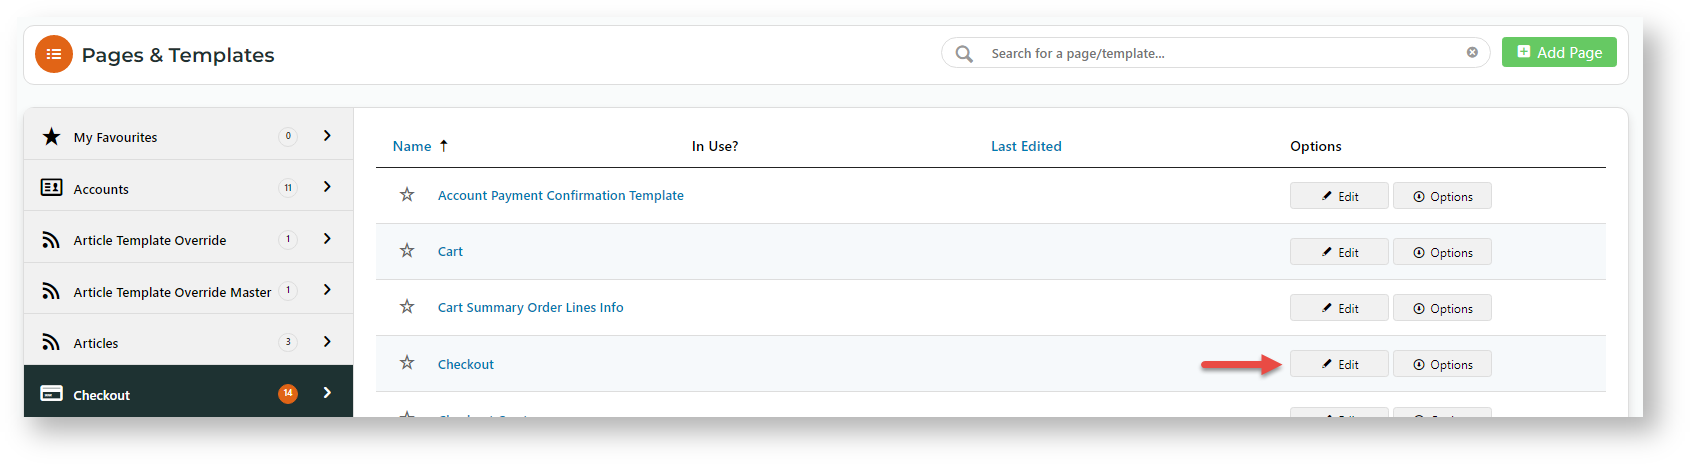
- In the zone you want the Preferred Delivery Date section to display, click Add Widget. TIP - Recommended placement for standard sites: 'Zone: Step1'
- Find the Forward Orders Widget and click Add Widget.
- Edit the widget options as you require. For a guide, see: Forward Orders Widget.
- Save your changes.
2. Check Quotes settings
The Quotes feature need to be enabled and set to one of these: 'Standard', 'Advanced with Freight' or 'Pronto Approved'. Otherwise, the Preferred Delivery Date section will not display correctly on the Checkout page.
If you do NOT want quotes to be on, you can enable quotes at the global level and disable quotes at the Role level. Login to the site as Administrator and go to Role Maintenance. select the Role, and in the Functions tab, change Allow Order Quote Requests to 'No'.
To configure the Quotes setting:
- In the CMS, go to Settings → Feature Management → Payment & Checkout.
- Enable Quotes, then click Configure.
- ln Quote Mode Selection select either Standard, Advanced with Freight or Pronto Approved.
- Click Save & Exit.


3. Set default Delivery Type
For each Role, you must set a default delivery type option for the Checkout page. This option will be highlighted the first time the user goes to the Checkout page. If ForwardOrder (here labelled as 'Preferred Date') is set, the Enter Date field is automatically displayed. NOTE - If a default option is not set, the section will not display properly.


- In the CMS, go to Users → Roles (if accessing this as an Admin user on the website, go to Account → Roles ('zRoles.aspx'))
- Click the radio button next to the required role.
- Click the Functions tab.
- Click Modify.
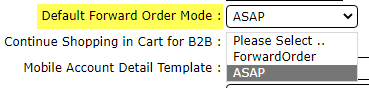
- Scroll down to Default Forward Order Mode.
- Select either ASAP (order will be sent as soon as possible) or ForwardOrder (allow user to select preferred date).
- To save, click OK.

4. Edit the preferred delivery date range
You can set a limit on how far into the future buyers can request a preferred date.
To set the forward date limits:
- In the CMS, go to Settings → Settings (if accessing this as an Admin user on the website, go to Settings → Settings ('zSettings.aspx'))
- Click the Orders tab.
- Click the Orders Conclusion tab.
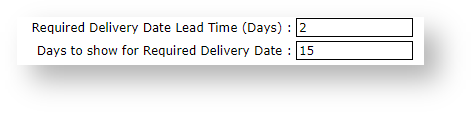
- Scroll down to Required Delivery Date Lead Time (Days) and Days to show for Required Delivery Date.
Required Delivery Date Lead Time (Days): number of days from date of order items will normally be shipped. Examples: '0' = preferred date range starts from order date. '2' = preferred date range starts from two days after order date.
Days to show for Required Delivery Date: days into the future user can select from Delivery Date Lead Time. Only dates that fall within the range entered here will be selectable by the user. Example: '15' means selectable date range will be calculated as 15 days after Delivery Date Lead Time.
Example: 2 days lead time and a 15 day range:- To save, click Update.


5. Edit the default preferred delivery type labels (optional)
By default, the labels for the preferred delivery type display as 'As Soon as Possible' and 'Back to School'. These may not be suitable for your business and can be edited separately.

To edit either label:
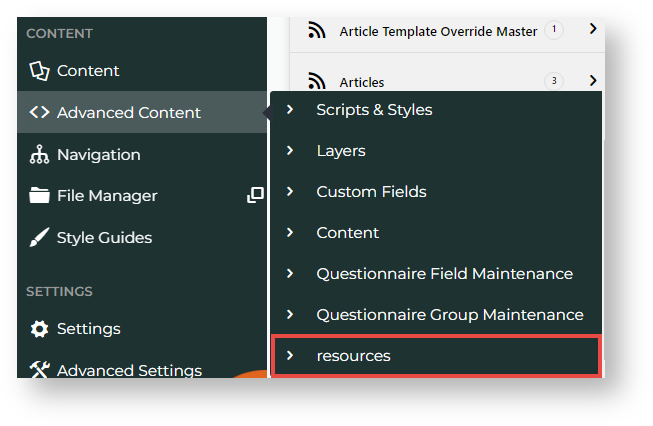
- In the CMS, go to Content → Advanced Content → Resources.
- To edit 'As Soon as Possible', in the Search tool, enter rcDynamicServiceForwardOrder_ASAP, then click Search. To edit 'Back to School', in the Search tool, enter rcDynamicServiceForwardOrder_FWD.
- Once you have entered the resource name, click Search.
- Click Modify.
- Edit Resource Value. This is displayed to users on the Checkout page.
- (Optional) If you wish to add a useful description for your team members who have access to Resources, enter a Description. This is not displayed to website users.
- To save, click OK.


Troubleshooting
If preferred date fields are not displaying during checkout, contact CV Support to edit the following settings.
Field Setting
CV Support may have to perform these setting updates if some or all input fields are missing.

| Minimum Version Requirements |
|
|---|---|
| Prerequisites |
|
| Self Configurable |
|
| Business Function |
|
| BPD Only? |
|
| B2B/B2C/Both |
|
| Third Party Costs |
|
Related Resources