The Search on your site is the most important tool for your customers to quickly and efficiently find what they want to buy and research. The standard Search is provided through the Product Search Widget. Search can also return rich content by using the Product Search with Preview Widget instead.

| Panel | |
|---|---|
On this page:
|
| Excerpt | ||
|---|---|---|
| ||
Configure the Product Search facility on your website. |
| Multiexcerpt | ||||
|---|---|---|---|---|
| ||||
| Multiexcerpt | ||
|---|---|---|
| ||
The Search tool and the results returned can be configured to suit your site's needs. Select:
|
How does Search work?
As your customer types text into the Search box, matching results display in a dropdown list. This dropdown space can be configured to suit. For instance, rather than seeing a simple list of product names, it can display richer content such as product images, titles, and codes. You can also restrict the number of products that appear. And if the customer does not see what they are looking for, they can press 'Enter' or click 'View More', to reach the Search Results page, to see all matches.
Step-by-step guide
Add Product Search Widget
This widget will render a Search box with results listed.

- In CMS, navigate to Content → Pages & Templates
- Click Theme Layout.
- Click Edit.
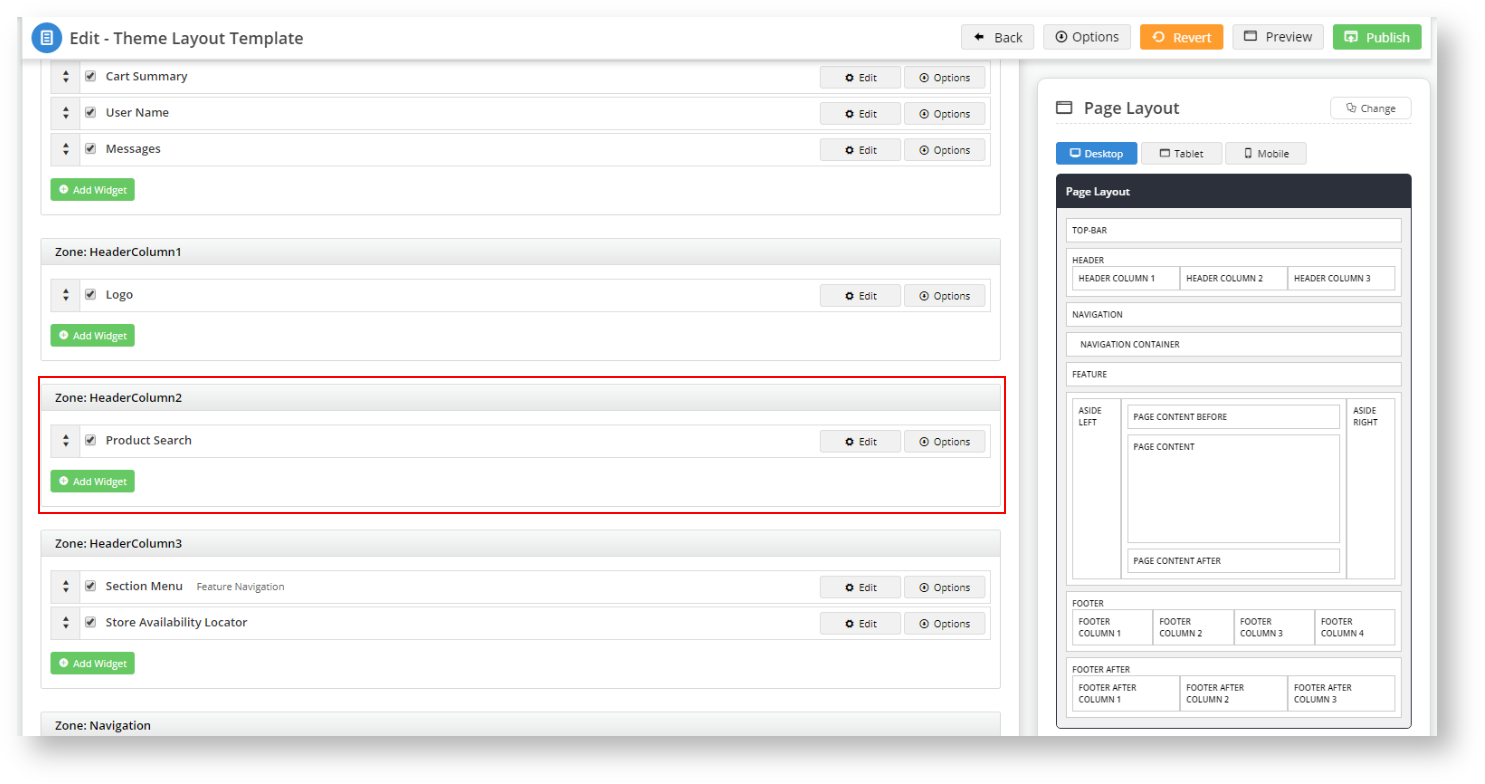
- Locate the 'Product Search Widget' in your Theme Layout template. In our example, it is in Zone: HeaderColumn2.
- In the widget, customise Search by selecting or entering the values required. See: Product Search Widget.
Add
the 'Search with Preview
' widgetIn the same zone as the Product Search widget, add the Search with Preview widget by clickingWidget (optional)
This widget will render a Search box with results with richer data and images.

- In the Theme Layout template, in the zone you want to add the Search box, click Add Widget.
- From the popup window, search for the Product Search with Preview Widget. Make sure it is highlighted, then click Add Widget.
- In the widget Search Placeholder, you can change the Search Placeholder text to display displayed as a meaningful prompt , so your customers know what to expect when they start typing in text. In this example, our prompt is “Product Search with Preview”.
You can also in the Search box if required.- In Number of products to display, change the number of products the search facility will display as your customer is typing in their text by changing the Number of products to display. The default the Search displays in the dropdow space as the user types. Default (and maximum) is : 9.
Click Save to add the new- To configure more options, see: Product Search with Preview widget to your theme layout.
Click Publish to effect the change to Widget.- To save, click Save.
- If your site uses Page Preview, click Publish to see the changes on your website.
- Navigate to Content → Pages & Templates → Products.
- Verify that you have Product Search with Preview List Item Template and Product Search with Preview Template in the list.
- Click Product Search with Preview Template. You should see four widgets in the layout:
Product Search with Preview Product Category List
Product Search with Preview List Title
Product Search with Preview List Grid
Product Search with Preview Show All Button.
You can customise the search return message in the first three widgets by clicking their title or their respective Edit button.

- You can customise the message that the system displays when it lists product results as the customer is typing text into the search field; the default is View All. In our example, we will use See More?
- Click Publish to effect the change to your website.
- Navigate back to Content → Pages & Templates → Products page.
- Let's review the Product Search with Preview List Item Template content and customise if required.
- No option in the Product Search with Preview List Item Template widget layout list requires changing to facilitate the new product search with preview functionality.
However, you may want to tailor messages or button prompts to match your brand’s voice and tone.- Click Publish to effect the change to your website.
- Go to your website and verify that the Product Search with Preview and Filtering functionality works as expected:
- You should see your Product Search with Preview button underneath your Product Search prompt.
- You don't have to have both search facilities implemented; choose which one you and your customers prefer.
- In the Product List search (we have ours configured to only show the product name), type in a search text, such as “glove”, and note the results' list.
- Type the same term, glove, into the new Product Search with Preview field, and note the difference in the returned search results.
- Press ENTER or click your prompt
in our example, and the system will take you to the Search Results page.
- Click the Filter By button and review the Brands by which you can filter your search results. Do the same with categories if you classify your products by category.
- The previous views were in Grid mode. Click List to view in List mode.
- You can also sort your search results by Relevance or (reverse-) alphabetically by brand, description, or product-code.
- If you Search Results in List mode, note that the next Product Search With Preview search will display the results in the drop down in LIST format rather than GRID.
- Type a search term into the Product Search With Preview search box.
- Click the "View All" prompt and press Enter to view all the search results.
- When the results come up, click List to display the results in List view
- Now return to the Product Search With Preview search box and type in a new search term. The resultant drop down list is in List view.
- Experiment with the customisation parameters under each of the Product Search with Preview widgets covered in this knowledge base to see what works best for your site.


Additional Information
Minimum Version Requirements
Multiexcerpt
MultiExcerptName Minimum Version Requirements 4.13.00
Prerequisites
Multiexcerpt
MultiExcerptName Pre reqs --
Self Configurable
Multiexcerpt
MultiExcerptName Self Configurable Yes
Business Function
Multiexcerpt
MultiExcerptName Business Function Structure
BPD Only?
Multiexcerpt
MultiExcerptName BPD Only Yes
B2B/B2C/Both
Multiexcerpt
MultiExcerptName B2B/B2C/Both Both
Third Party Costs
Multiexcerpt
MultiExcerptName Third Party Costs n/a
Related help
Content by Label
showLabels false max 5 spaces KB showSpace false sort modified reverse true type page cql label in ("product-search","product-search-site") and type = "page" and space = "KB" labels new ver41300 how-to
Multiexcerpt
hidden true MultiExcerptName Features List Headers Macro Instructions for carrying Article Information through to Feature List
Minimum
Version
Requirements
BPD
ONLY
Business Function
B2B
B2CBOTH
Feature
Feature Description
(Written for our customers and can be pasted into comms sent to them)
Additional info
Pre-Reqs/
GotchasSelf Configurable Third Party Costs
Instructions for carrying Excerpts through from this page to the Feature List
Article Page:
Add macro / Multiexcerpt (or copy and existing excerpt and edit) or (Copy existing page and place content into existing excerpt macros)
On Features List page:
Click in the Cell to be populated / add macro / Multiexcerpt Include / Select the Article page and the excerpt (or copy another feature line and edit the 'Article page' source.