...
- In the CMS, navigate to Settings → Feature Management → Products & Categories and toggle on Cluster Line Type Maintenance.
- Click Configure.
A
3. Add Cluster Line Types
A cluster 'line type' is a header you will add products to.
...
In our example, we are going to create
...
a catalogue of school items ('book list') to be purchased by parents with children of a particular school year. Some products will be compulsory and some will be optional. So we will create headers for the two line types: 'Compulsory' and 'Optional
...
'.
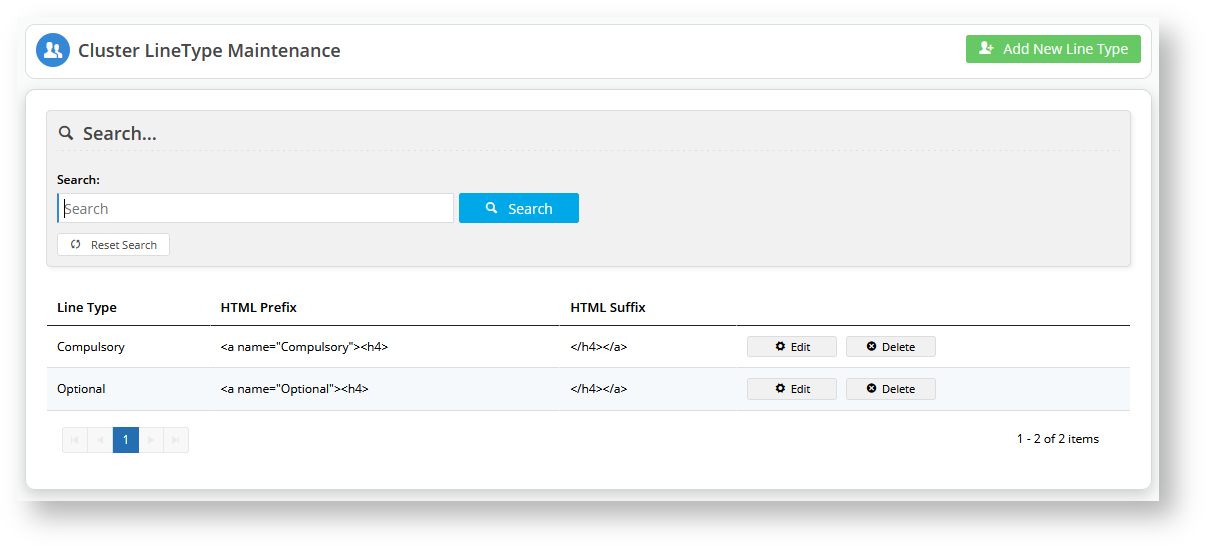
In Settings → Cluster Line Type Maintenance, click Configure to go to the 'Cluster Line Type' page.
Info Once 'Cluster Maintenance' is toggled on in 'Settings', the Cluster LineType Maintenance menu item is available in the Products & Categories menu. You can also add, edit and delete line types here.
- Click Add New Line Type.
- Enter
- Enter details for Line Type, HTML Prefix, and HTML Suffix.
- Click Save.
- Click Save. The line type will be listed in the list of line types for the cluster.
- Create any other line types you need. For our example, repeat steps 3-5 to create the 'Optional' line type.

...
...
Once 'Cluster Maintenance' is toggled on, 'Cluster LineType Maintenance' is available in the Products & Categories menu. You can access line types to add, edit and delete them here.
2. Turn a
...
category into a
...
cluster
A category has to be enabled as a cluster in its Category Maintenance page. You can turn an existing category into a cluster or create a new category first. For our example, we will create a new category.
- Navigate to Products & Categories → Category Maintenance.
- In Add New Category..., enter the category name and click Create. The category will be added to the bottom of the list.
...
- To turn the category into a cluster, click Edit.
- In Enable Cluster, select 'Yes'.

- Click Save & Exit. In the Category list,
...
- this category
...
- is now displaying '0
...
- clusters' instead of '0
...
- products'.

3. Build a cluster for a category
- In the Category list, hover over Options for the category and select Cluster.

- In Description, add the header for the cluster. For the example, we will add the header 'Compulsory'.
- In Type, select a line type. Here, we will select 'Compulsory'.

- To save this line type to the category, click Add None Product.
- Repeat steps 2 to 4 for each extra line type you need. (For the example, we have added 'Optional'.)

4. Add Products to Cluster Types
Now we need to add some products to each cluster type.
- In the Category list of line types, click Edit for the line type you want to add products to.
- In Product Search, type in the name of a product and click Add Product. The product will appear at the end of the list.
- Drag and drop it the product under a header. In our example, we will add our first product to our 'Compulsory typeproducts'.
- Repeat Repeat steps 2-3 for all the products you want to add to each line type in the Cluster.


5. Edit product details in a cluster
Each product contains details that define its cluster properties.
26. You can also configure a choice between products. For instance, we are going to allow people to choose either
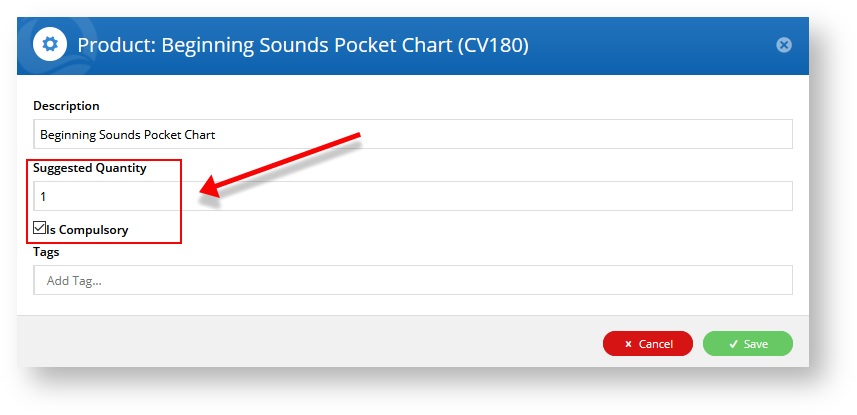
- For each product in the cluster, click Edit.
- Edit any of the fields as required.
Description: name of the product the product name will default but you can change it to something more helpful to your customers if you wish
Suggested Quantity: (optional) enter at least '1' if this product is under the compulsory or choose one line types. If the product is optional, leave it at '0'.
Is Compulsory: check the box if the product must be purchased.customer must buy this product
Tags: tags are used to associate two or more products when the line type asks the buyer to choose a product from a list of gives the customer a choice between two or more . (See below. -line type 'Choose One')
When products. To add an associated product, type its product code, then hit 'Enter' on your keyboard.- When you have finished editing the product, click Save.
Creating a 'choose one' cluster line type
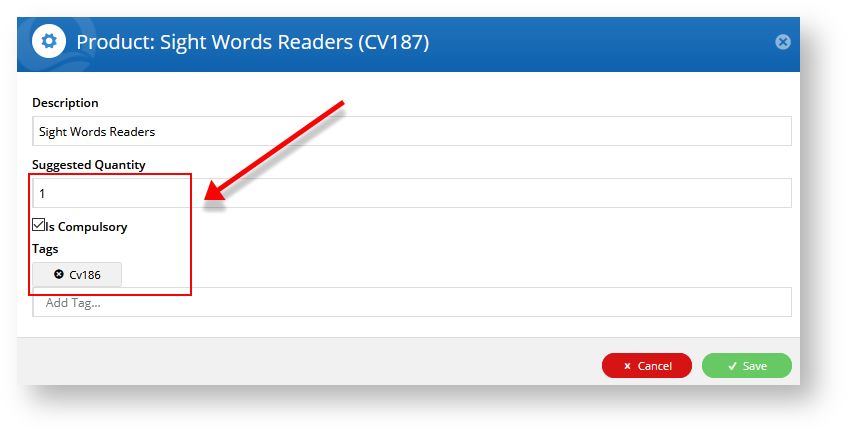
Apart from compulsory and optional line types, you can configure a line type to contain a list of products from which the customer can or must select one. In our example, we want customers to choose between the products Sight Words Readers (CV187) or Sight Words Flash Cards (CV186).
27. To distinguish those products from the other compulsory products, we will create a new Line Type Header called Choose One. If you forget how to do that, refer to step 8 and click Add New Line Type.
28. Navigate back to our Category Cluster:. Hover over options
- In the Cluster LineType Maintenance page, create a line type header with an appropriate name, e.g., 'Choose One'.
- Navigate to the Category Cluster (Products & Categories → Category Maintenance
The header does not have to have the same name as Tip
- ), hover over Options next to your cluster and select Cluster.
29. Type a description: Choose One Compulsory with a type of Choose One.
- In Description, enter a header for line type. This does not have to be identical to what the Cluster Line Type was named in step 1.
30. Add your new heading just before the Optional Products heading.
31. Drag your two products under the new heading34. In the Add Tag... field, type in CV186 and hit return. This tells the system that CV186 is CV187's partner product
- In Type, select 'Choose One' (or the name you entered when it was created in step 1).
- Add the products that are associated with this 'Choose One' line type. Make sure they appear under the right line type header. In our example, those products are 'CV186' and 'CV187'.

We need to tell the system that the customer can buy CV186 or CV187, but they don't have to purchase both.
32. Click Edit next to CV187.
33. Tick Is Compulsory and set Suggested Quantity to 1.
the tag displays above the Add Tag... field with a little x next to it
- To associate the two products and to set it so the customer can select one of the two, each associated product's cluster details needs to be edited. Click Edit for one product.
Edit the product details:
Description: the product name will default but you can change it to something more helpful to your customers if you wish
Suggested Quantity: enter at least '1'
Is Compulsory: check the box
Tags: add the product code of associated products. Type a product code, then hit 'Enter' on your keyboard. If there are more than one associated product, continue to type in the product code then hit 'Enter' for each one.
Note You must hit return so
35. Save 40. Click Save to save the changes to your Category Cluster.
each product code displays under the field header 'Tags'. To remove a product code, click on the 'x' next to a product code.
- Save your changes.
36. Click Edit next to CV186.
37. Tick Is Compulsory and set Suggested Quantity to 1.
38. In the Add Tag... field, type in CV187 and hit return. This tells the system that CV187 is CV186's partner product.
39. Save your changes.
41. Save
- Repeat steps 6-8 for each associated product.
- The system will advise you that you will need to refresh the Cache Management.
and
- Click Save and Exit
Settings →
- , then navigate to
.42. Next to
- Settings → Cache Management
43. When
- ,
- Next to 'Product Cache', click Clear Cache.
completes
- When the process
- is complete, click Close.
Let's test the new Cluster Category.
Head to your website.


## got up to here ##Anchor gottohere gottohere Additional Information
Multiexcerpt
MultiExcerptName Additional Info
Minimum Version Requirements
Multiexcerpt
MultiExcerptName Minimum Version Requirements 4.17.00
Prerequisites
Multiexcerpt
MultiExcerptName Pre reqs --
Self Configurable
Multiexcerpt
MultiExcerptName Self Configurable Yes
Business Function
Multiexcerpt
MultiExcerptName Business Function Products & Categories
BPD Only?
Multiexcerpt
MultiExcerptName BPD Only Yes
B2B/B2C/Both
Multiexcerpt
MultiExcerptName B2B/B2C/Both Both
Ballpark Hours From CV (if opting for CV to complete self config component)
Multiexcerpt
MultiExcerptName Ballpark Hours From CV (if opting for CV to complete self config component) Contact CV Support
Ballpark Hours From CV (in addition to any self config required)
Multiexcerpt
MultiExcerptName Ballpark Hours From CV (in addition to any self config required) Contact CV Support
Third Party Costs
Multiexcerpt
MultiExcerptName Third Party Costs n/a
CMS Category
Multiexcerpt
MultiExcerptName CMS Category Category Maintenance
Related
...
help
Content by Label
showLabels false max 5 spaces KB showSpace false sort modified reverse true type page cql label in ("new","ver41700","how-to","cms","category-maintenance") and type = "page" and space = "KB" labels how-to new cms ver41700
Multiexcerpt
hidden true MultiExcerptName Features List Headers Macro Instructions for carrying Article Information through to Feature List
Minimum
Version
Requirements
BPD
ONLY
Business Function
CMS Category
B2B
B2CBOTH
Feature
Feature Description
(Written for our customers and can be pasted into comms sent to them)
Additional info
Pre-Reqs/
GotchasSelf Configurable Ballpark Hours
From CV(if opting for CV to complete self config component)
Ballpark Hours
From CV(in addition to any self config required)
Third Party Costs
Instructions for carrying Excerpts through from this page to the Feature List
Article Page:
Add macro / Multiexcerpt (or copy and existing excerpt and edit) or (Copy existing page and place content into existing excerpt macros)
On Features List page:
Click in the Cell to be populated / add macro / Multiexcerpt Include / Select the Article page and the excerpt (or copy another feature line and edit the 'Article page' source.