| Excerpt |
|---|
|
Make Order Tracking available for a User group. |
Overview
| Multiexcerpt |
|---|
| hidden | true |
|---|
| MultiExcerptName | Feature Overview |
|---|
|
Online order tracking is easy. Depending on settings, Users can search for specific orders, filter by date, product, order status, and so forth. |
Online order tracking allows website users to look up their entire order history. Depending on settings, users can search for specific orders or use filters to find orders by date range, delivery date, product purchased, order status, etc. Administrators can also customise display options and functions through the Track Order Widget. For instance, a range of options for the availability and download/printing of invoices are available.
| Tip |
|---|
|
| Multiexcerpt include |
|---|
| MultiExcerptName | Why are my customers' completed orders still in their Order History? |
|---|
| PageWithExcerpt | FAQs |
|---|
|
|
| Info |
|---|
| title | Need customised fields and functions? |
|---|
|
This guide describes the default options for the Order Tracking function. To implement additional fields and options you want to provide for your customers in order tracking, e.g., Job Number, please contact Commerce Vision. |
Your users access Order Tracking on the Dashboard menu when logged into your website. The name of the menu may be different, depending on what it has been named during set up. It is usually called 'Track Orders' or 'Order History'. NOTE - It is available only if the user's role includes tracking their orders. The functionality is generally enabled for B2B customers but can be made available to any user group.

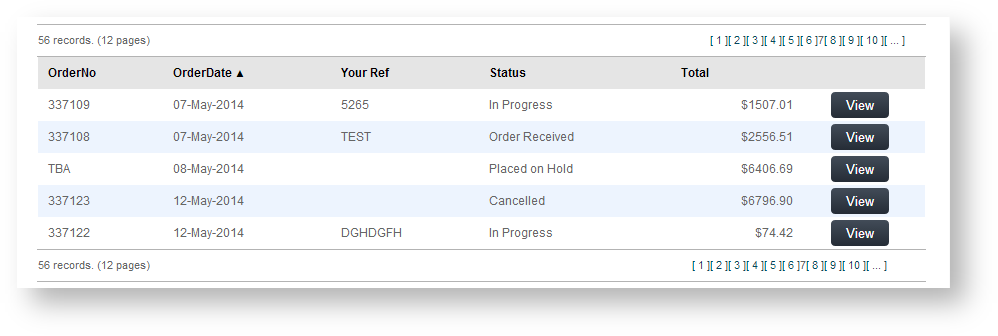
By selecting the 'Order History' menu item, the user is taken to the Order History page. They can search for a specific order or find orders that fit the search criteria.

Under the Search tool, the Order History page will list all orders and related data such as current order status, order date, and order total. (Editing display options is done in the Track Order Widget.)

The user can click View to see an order's details. There, the user can view the order, copy items to their cart and print the order. If the order has been completed, the Invoice Reprint button will be available.
| Tip |
|---|
| title | For Customer accounts with Approvals enabled |
|---|
|
If an Advanced Order Approver by User and Account option with re-assign approver has been set up for a Customer account, the user will be able to re-assign to another available approver in Order Tracking. The log of actions relating to the approval, e.g., approver changed, approval time stamp, are also displayed. Orders pending approval can be searched for in Order Tracking. - In the Order Status field, select 'Orders Requiring Approval'.

- Enter any start/end dates to limit the search.
- Click Search.
- Click View for any found 'pending order'.
- In the Approval Status panel, you can re-assign the approver if there is another valid approver.

|
Step-by-step guide
Enable Order Tracking
NOTE - Enabling Order Tracking is usually already completed by Commerce Vision for your site.
To enable Order Tracking:
- Login to your website as an Administrator.
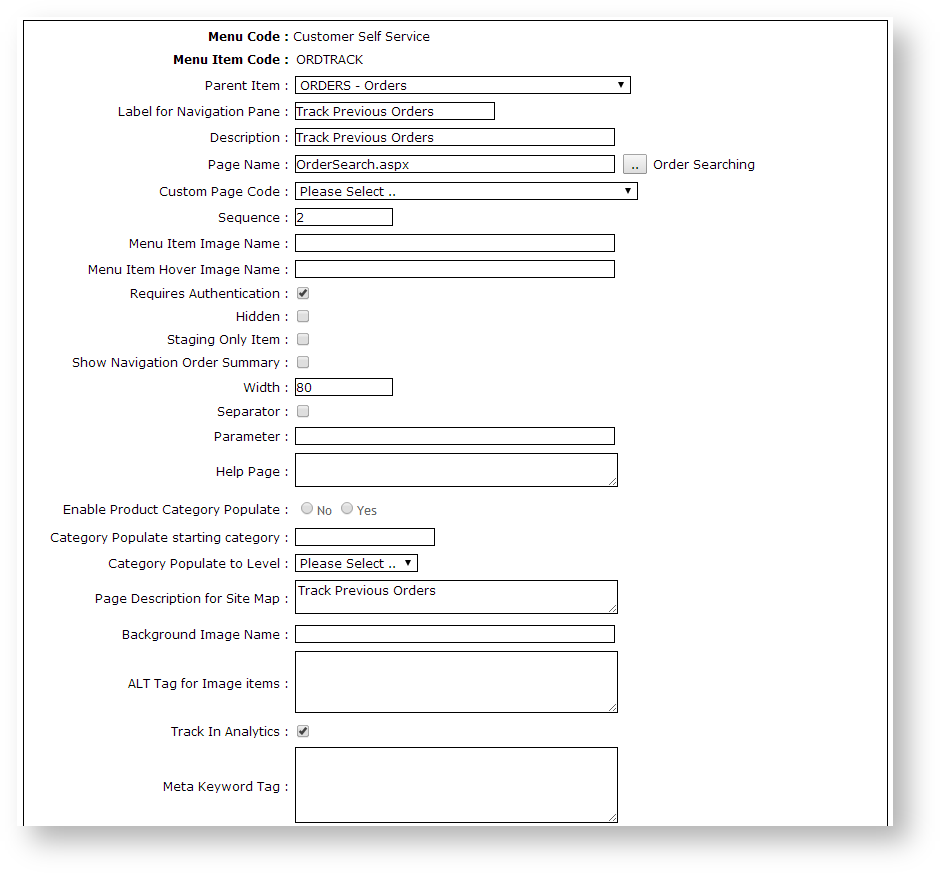
- Navigate to Content → Menu Editor (/zMenus.aspx).
- Select the required Menu Code.
- Click Parent Items.
- Select the required Menu Item Code.
- Click Menu Items.
- Add OrderSearch.aspx as a new menu item. See Adding a new menu item for further details.

- Enter the label name and details for the menu item as well as where it will be located in the User's navigation menu. The label usually used is 'Order Tracking' or 'Order History'.
Update Order Tracking Settings
Display and function options on the Order Tracking screen are configured in the Track Order Widget. Here, you can enable and disable default settings, add additional functions, and edit labels for Track Order buttons and fields.
To edit the Track Order Widget:
- In the CMS, navigate to Content → Pages & Templates.
- Use the Search tool to find the 'Track Orders' template.

- Click Edit.
- Find the Track Order Widget and click Edit.

- Edit the settings as required. For guidance, see: Track Order Widget.
 1000
1000
Additional Information
| Multiexcerpt |
|---|
| MultiExcerptName | Additional Info |
|---|
|
With order tracking enabled, it's possible to customise the order status descriptions that users see. Refer to How to customise Order Status descriptions for further information. |
| Minimum Version Requirements |
| Multiexcerpt |
|---|
| MultiExcerptName | Minimum Version Requirements |
|---|
| **.**.** |
|
|---|
| Prerequisites | |
|---|
| Self Configurable |
| Multiexcerpt |
|---|
| MultiExcerptName | Self Configurable |
|---|
| yes |
|
|---|
| Business Function |
| Multiexcerpt |
|---|
| MultiExcerptName | Business Function |
|---|
| Self Serve |
|
|---|
| BPD Only? | |
|---|
| B2B/B2C/Both |
| Multiexcerpt |
|---|
| MultiExcerptName | B2B/B2C/Both |
|---|
| B2B |
|
|---|
| Ballpark Hours From CV (if opting for CV to complete self config component) |
| Multiexcerpt |
|---|
| MultiExcerptName | Ballpark Hours From CV (if opting for CV to complete self config component) |
|---|
| Contact Commerce Vision |
|
|---|
| Ballpark Hours From CV (in addition to any self config required) |
| Multiexcerpt |
|---|
| MultiExcerptName | Ballpark Hours From CV (in addition to any self config required) |
|---|
| 1 |
|
|---|
| Third Party Costs |
| Multiexcerpt |
|---|
| MultiExcerptName | Third Party Costs |
|---|
| n/a
|
|
|---|
| CMS Category |
| Multiexcerpt |
|---|
| MultiExcerptName | CMS Category |
|---|
| Order Tracking |
|
|---|
Related help
| Content by Label |
|---|
| showLabels | false |
|---|
| max | 7 |
|---|
| spaces | KB |
|---|
| showSpace | false |
|---|
| sort | modified |
|---|
| reverse | true |
|---|
| type | page |
|---|
| excludeCurrent | true |
|---|
| cql | label = "orders" and type = "page" and space = "KB" |
|---|
| labels | orders |
|---|
|
| Content by Label |
|---|
| showLabels | false |
|---|
| showSpace | false |
|---|
| title | Related widgets |
|---|
| excludeCurrent | true |
|---|
| cql | label = "widget" and title ~ "track order widget" |
|---|
|


