PayPal in Braintree Payments
When PayPal is controlled in Braintree Payments settings, one or all of these PayPal options can be enabled on your site:
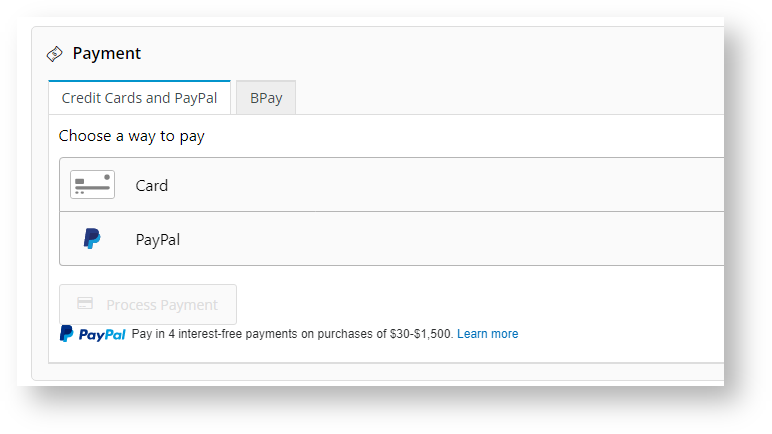
PayPal under the Braintree Payments 'Payment Methods' tab during the checkout process. NOTE - For PayPal checkout, vaulting can be enabled to save the PayPal account details for future use without requiring re-authenticating with PayPal. Vaulting is not compatible with Pay in 4. If it is enabled, once logged into PayPal, Pay in 4 will not be offered as an option to a logged in registered user.
1, In the Payment panel during checkout, PayPal displays as a payment option under Braintree's Payment Methods tab.

2. When the user selects PayPal, the PayPal button is displayed.
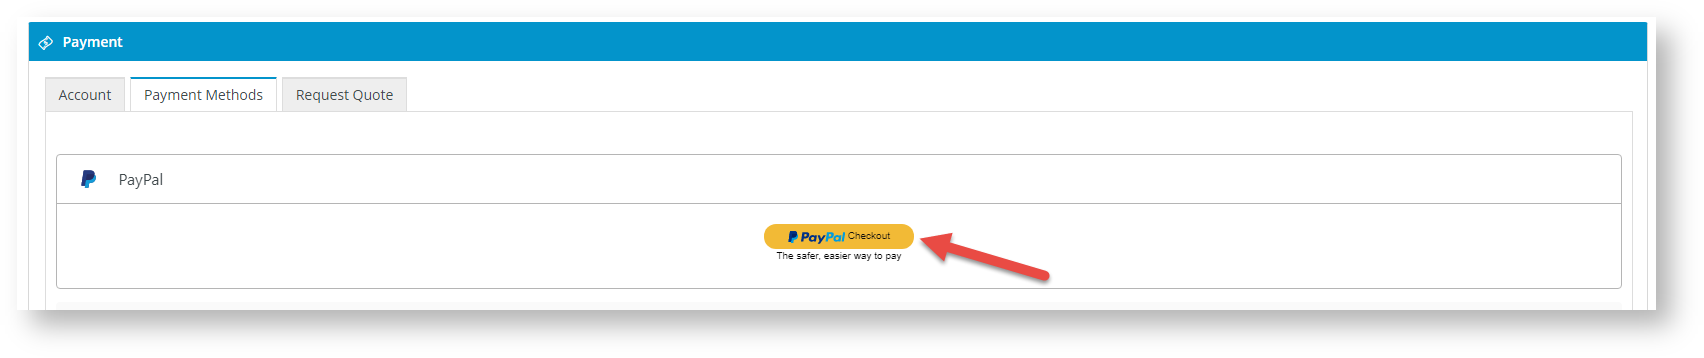
3. The user clicks the PayPal button for the secure PayPal login window.
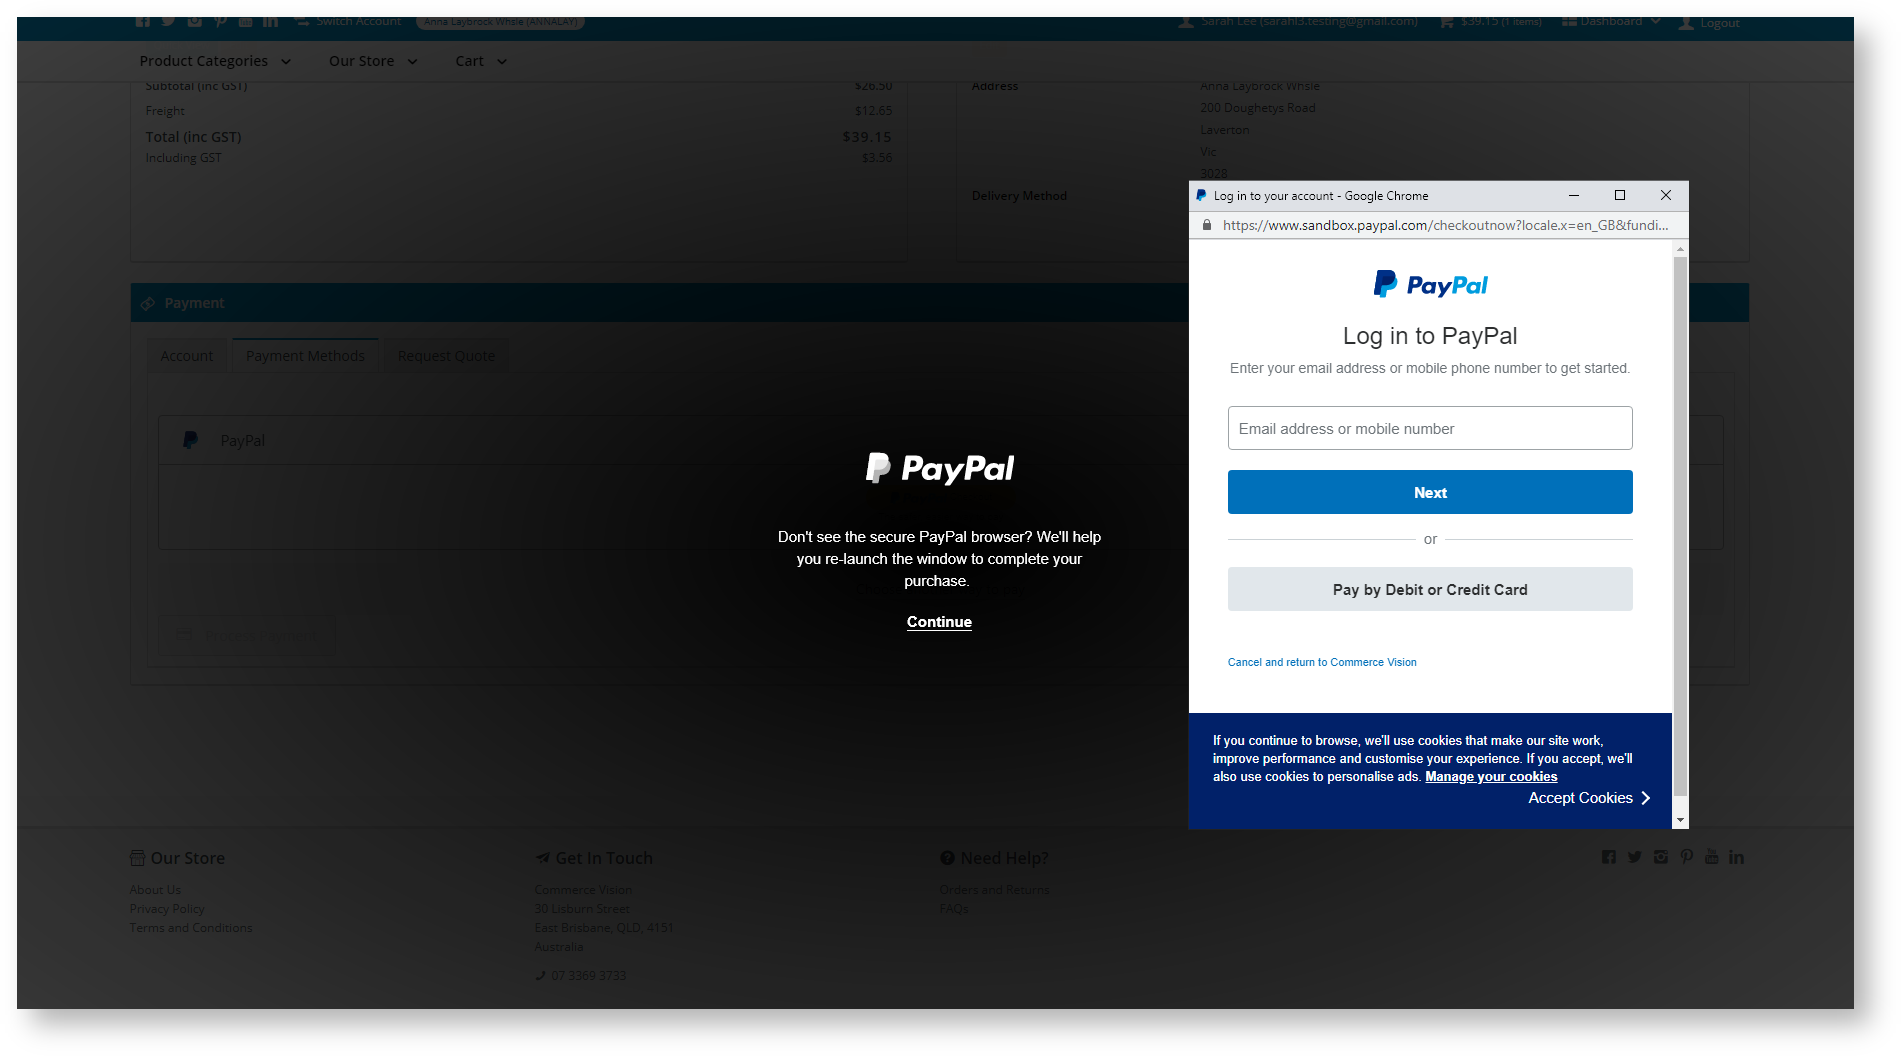
4. The user logs into their PayPal account and selects from available payment options. After payment selection has been approved, they are returned to your website. The PayPal account with login ID is displayed.

5. The user clicks Process Payment to complete payment. If 'Allow Vault PayPal' is enabled, a successful PayPal account will be vaulted ready for future purchases.
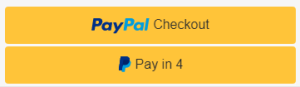
PayPal Express options. These PayPal payment methods are accessed via buttons on the product and cart pages. They are 'express' because the customer can log in to PayPal immediately to pay without adding to cart and going through the usual checkout process steps. Choose one or both Express options: PayPal Checkout, Pay in 4 (PayPal's Buy Now, Pay Later).
NOTE - Adding PayPal Express checkout through Braintree settings disables the use of separate PayPal Express settings.


Configure PayPal Settings
Your business must have a PayPal merchant account and your PayPal merchant credentials must have been added in your Braintree account.
PayPal Testing
Please consult Braintree documentation about testing your PayPal-Braintree integration.
To configure Braintree PayPal settings on your website:
- Navigate to Settings → Payment & Checkout → Braintree Payment.
- If the Available in CMS toggle is not enabled, toggle it ON.
- Click Configure.
- Scroll down to PayPal Settings.
In the PayPal settings section, toggle ON Enable PayPal. This enables Braintree PayPal on your site.
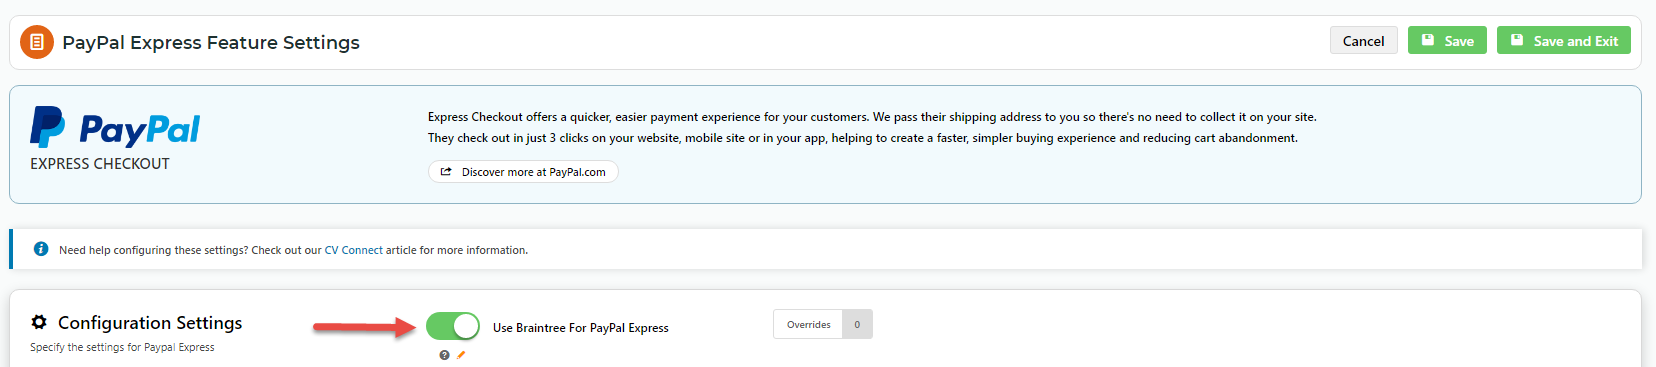
When Braintree PayPal is enabled, separate PayPal Express settings are disabled.Navigate to Settings → Feature Management → Payment & Checkout → PayPal Express. The Use Braintree For PayPal Express toggle is ON.
- Allow Vault PayPal: Toggle ON to automatically save a successful PayPal payment for future use. IMPORTANT- PayPal vaulting is incompatible with offering Pay in 4 during checkout. If this toggle is enabled, PayPal Pay in 4 will not be displayed as a payment option when the user is logged into their PayPal account.
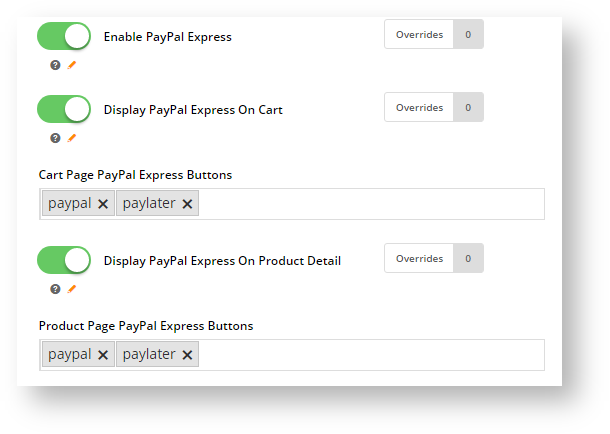
The next few toggles and fields configure PayPal Express options in the product and cart pages.
- Enable PayPal Express: toggle ON for PayPal Express options to be controlled by Braintree Payments. NOTE - This disables non-Braintree PayPal Express on your site.
- Display PayPal Express On Cart: toggle ON to display PayPal buttons in the cart.
- Cart Page PayPal Express Buttons: click in the field to select which Express buttons to display in the cart. (Buttons are displayed in the order of selection entered here.)
PayPal: PayPal button
Paylater: Pay in 4 button- Display PayPal Express On Product Detail: toggle ON to display PayPal buttons in product pages.
- Product Page PayPal Express Buttons: click in the field to select which Express buttons to display in product pages. (Buttons are displayed in the order of selection entered here.)
PayPal: PayPal button
Paylater: Pay in 4 button- To save your settings, click Save.
- If you are offering PayPal Express options on your site, PayPal Express must be turned on in the CMS. To do this,
- Go to Settings → Feature Management → Payment & Checkout.
- Toggle ON PayPal Express.


Customise PayPal Express Buttons
The default PayPal Express buttons are: ![]() and
and![]() . You can change how they look in the product detail and cart pages separately, in the Product Purchase Detail Widget and the Cart Checkout Button Widget.
. You can change how they look in the product detail and cart pages separately, in the Product Purchase Detail Widget and the Cart Checkout Button Widget.
To customise Express buttons:
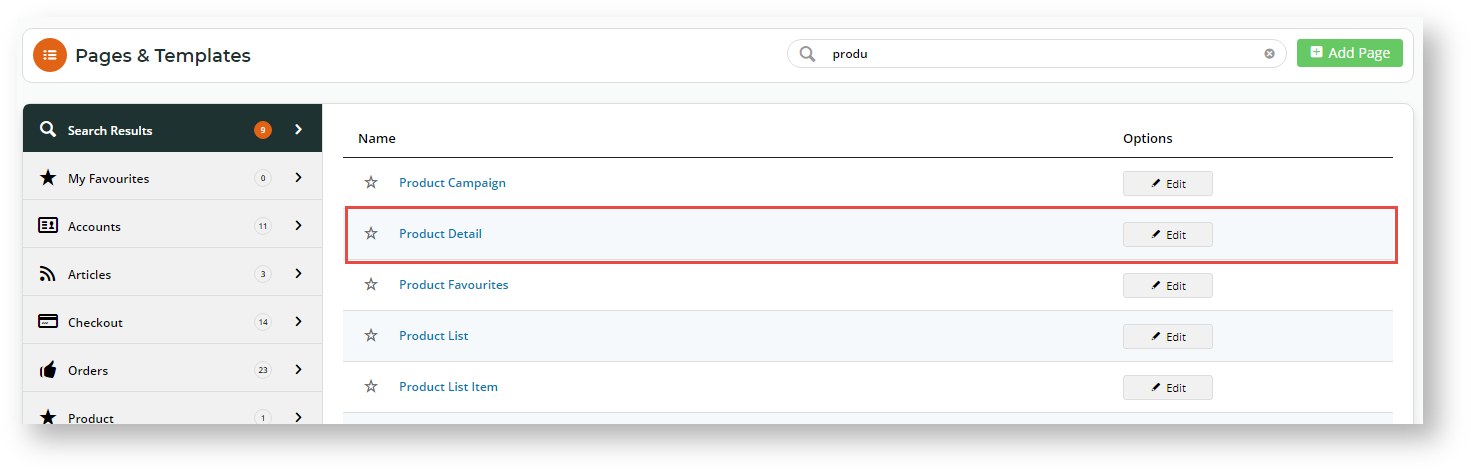
- Navigate to Content → Pages & Templates.
- Use the Search tool to find the template with the Product Purchase Detail Widget (the Product Detail template) or the Cart Checkout Button Widget (Checkout→ Cart template).
- Click Edit.
- Find the Widget and click Edit.
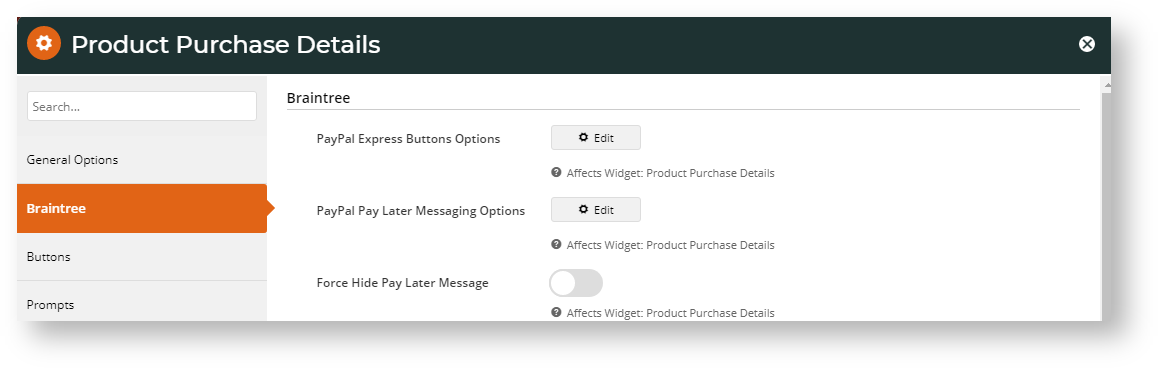
Click the Braintree tab.
To change the text and button style of the PayPal Express Button Options, click Edit.
Button Width
By default, the button adapts to the size of its container element. Adjust the width of the container element to alter the button width.
- Customise as needed.


Button Customisation Options
PayPal Button options Layout For multiple buttons, select to align them vertically or horizontally.
Default: vertical
Option: horizontal
Height
Specify a height from 25px to 55px.
NOTE - To use the default height (set by Braintree), do not add this setting.
Colour Default: Gold (PayPal-recommended as the brand's most recognised button colour).
Options: blue (recommended first alternative), silver, white, black
Shape Default: rectangle (PayPal-recommended)
Option: pill
Label Default: PayPal (recommended)
Options:
PayPal Checkout
PayPal Buy Now
Pay with PayPal


Add/Edit Pay in 4 Messaging
There are two messaging versions for Pay in 4:
- generic - standard messaging suitable and available for any page or template. Just add the PayPal Pay Later Generic Summary Widget to a page. A generic message can also be added in the Braintree Payments space on the Checkout page. Just toggle on the setting in the Checkout Payment Options Widget. (Note - Messaging is hidden for registered users when vaulting is on.)
- with instalment amount - messaging includes the actual amount of each instalment based on the product price or cart total on the page at the time. This is automatically enabled on the product detail page, cart page and the cart summary window. To disable the messaging, just toggle off the Pay Later message under the Braintree tab in the relevant widget:
- Product Detail page - Product Purchase Detail Widget
Cart Summary window - Cart Summary Widget
Cart Order Summary page - Cart Order Summary Totals Widget
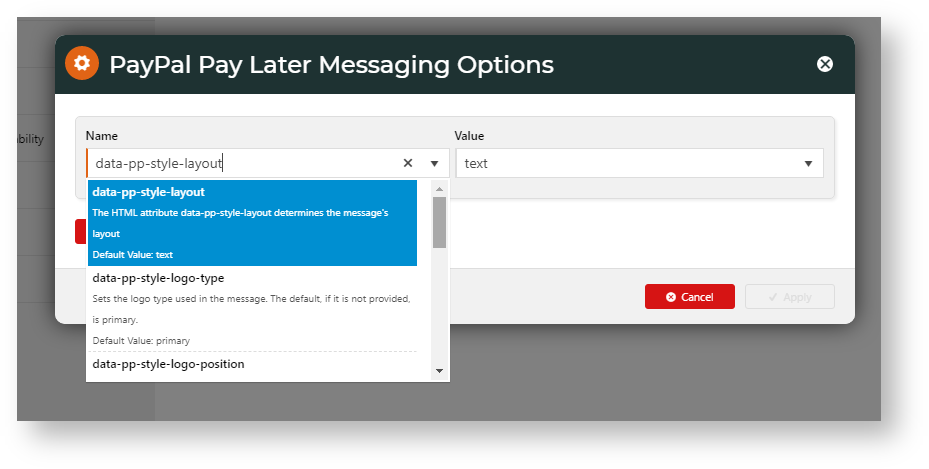
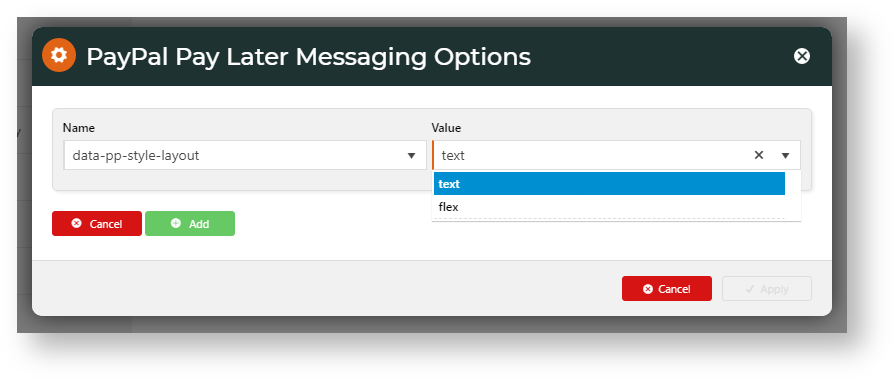
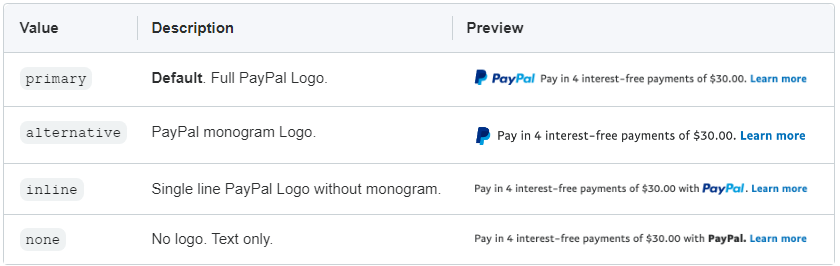
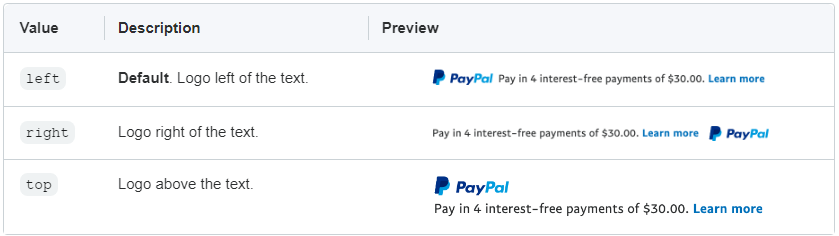
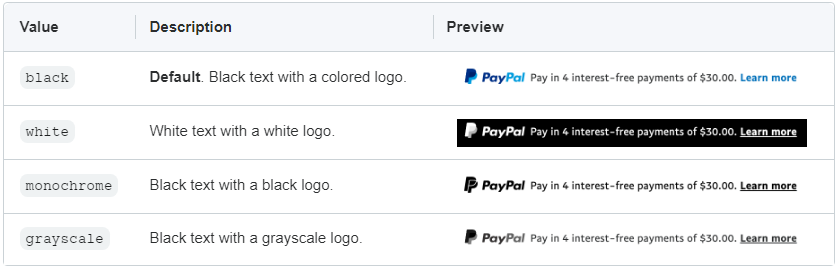
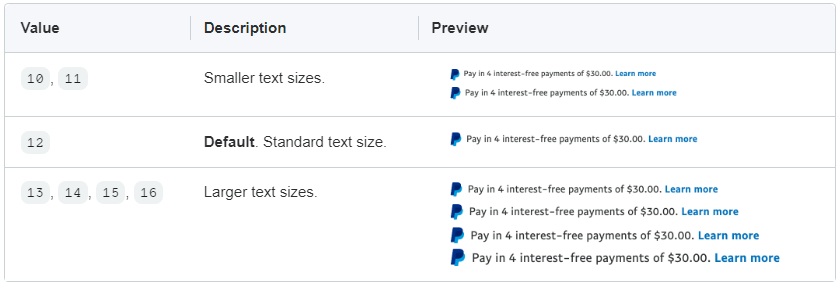
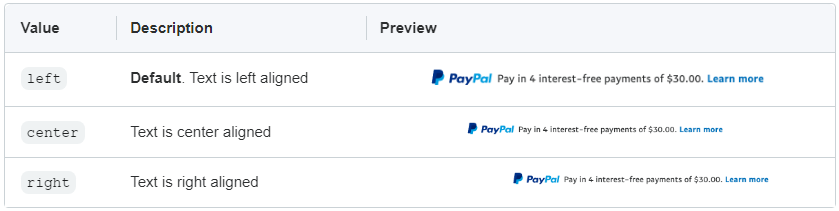
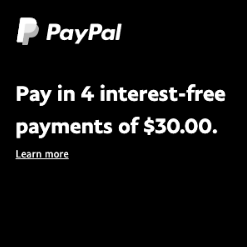
To customise the messaging style, in the widget: Repeat steps 2-4 for each option you want to set. To save, click Apply. Layout data-pp-style-layout Sets the messaging as text only or in a banner Default: text Option: Flex - displays a flexible display banner NOTE - If the Layout attribute is not added, 'text' will default. The text layout is ideal for placement under product and cart prices. The flexible display banner is ideal for placement above the fold on your home and product category pages. It is designed to be eye-catching. Logo type data-pp-style-logo-type Sets the logo type. Default: primary Options: alternative, inline, none Logo position data-pp-style-logo-position Sets the position of the PayPal logo in the message Default: left Options: right, top Text colour data-pp-style-text-color Sets the text and logo colour of the message. Default: black Options: white, monochrome, grayscale Text size data-pp-style-text-size Sets the size of the message text. Default: 12 Options: 10, 11, 13, 14, 15, 16 Text align data-pp-style-text-align Sets the direction the text aligns for text layout messages. Default: left Options: centre, right Banner Colour data-pp-style-colour Sets the banner colour (layout: flex) Default: Blue - blue background, white text, white logo OptionsBlack - black background, white text, white logo White - white background with blue text, coloured logo and blue border Gray - gray background, blue text, coloured logo Monochrome - white background, black text, black logo Grayscale - white background, black text, grayscale logo Banner Style Ratio data-pp-style-ratio Sets the shape and size of the banner message (layout: flex) Default: Ratio 1x1. Flexes between 120px and 300px wide. Options: Ratio 1x4. 160px wide. Ratio 8x1. Flexes between 250px and 768px wide. Ratio 20x1. Flexes between 250px and 1169px wide.
NOTE - To access PayPal Pay Later Messaging Options in widgets with the calculated payment messaging or in the Checkout Payment Options Widget, select the Braintree tab.

Messaging Customisation Options


![]()
![]()
Why would I want to hide the messaging?
This messaging is not controlled by where the Pay in 4 button is located. It simply displays after the Express buttons. So it may not display where you would like it to be. You can always add Pay in 4 messaging where you want it by adding the PayPal Pay Later Generic Summary Widget on any page or template.
Additional Information
| Minimum Version Requirements |
|
|---|---|
| Prerequisites |
|
| Self Configurable |
|
| Business Function |
|
| BPD Only? |
|
| B2B/B2C/Both |
|
| Third Party Costs |
|
Related help