Overview
This User Creation (REST) API is called with a payload of the user information from the a third party provider's contact screen. The web application will run validations and create the user after the validations are passed. An option in the payload is to specify whether a welcome email is to be sent to the user. Password is set via link in the email.
NOTE - This API creates a user against an existing Customer so the customer code must already exist.
This is the primary data sent in the payload:
- First Name
- Surname
- Email Address
- Customer Code
- Account Administrator (for notification of newly-created user)
If the user already exists, you will be alerted with a message.
Guide
This guide covers what you have to do in the process to set up the User Creation API.
Prerequisites
- URL (will be provided to you)
- Username
- Password
- API testing app / browser add-on:
- Postman (Chrome) - https://www.postman.com/downloads/
- Poster (Firefox) - https://addons.mozilla.org/en-US/firefox/addon/poster/
Step-by-step guide
1. Get Authorisation Token
Before any API call is made, an authorisation token must be created. To retrieve the authorisation token and code to the API call endpoint, you will need the following:
- The ClientID and ClientSecret: Commerce Vision will provide these to you
1. Open your Postman app.
2. In Access Token URL, enter the URL (given to you).
3. Add the Client ID and Client Secret provided to you.

4. Click Get New Access Token to get the token.
5. The response is an object with two fields:
- Token Type: this is the authorisation type that is needed for the api calls (should be 'bearer' usually)
- Access Token: this is the actual token

6. Click Use Token.
2. Make the API call
(note to self- waiting for data)
You will need:
- The Token API endpoint: /api/token
- The API endpoint: /api/user
The Token Type and Access Token you created are needed to make the API call. The API endpoint requires use of the token type and token in the authorisation header.
1. Set the request type to 'POST'.
2. Enter the URL (domain name) and then add /api/user

3. In the Authorizations tab, select 'OAuth 2.0'

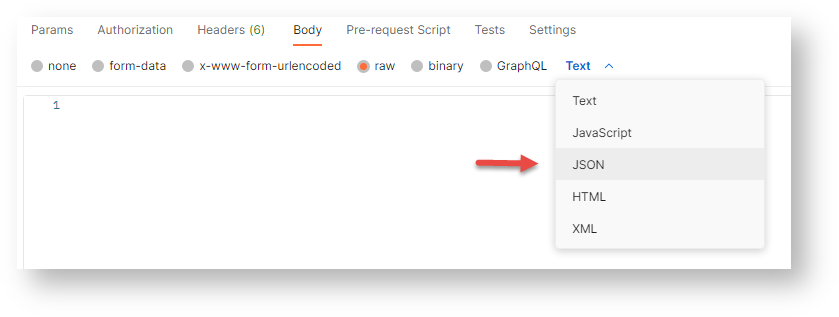
4. In the Body tab, select Raw, then JSON. The API request will return the payload in JSON.
5. Click Send.
NOTE - The response object should contain a response that allows you to see whether the call succeeded and whatever response information the call will return. All responses should contain "Success" and may contain "Message" (it should have the field but might have no content depending on the service). All other fields on the response object are endpoint specific.
|
