You can maintain products and categories for the web via the 'Web Product Maintenance' menu in PRONTO. Available functions include:
- Maintain web categories.
- Add / remove products from the web.
- Add / remove products from alternate categories.
- Maintain product accessories.
- Maintain 'cross sell' products (alternates).
- Maintain product notes.
- Maintain product search keywords.
- Maintain product metadata
Step-by-step guides
To Maintain Categories:
- Login to PRONTO
- Navigate to 'Web Site Category / Product Maintenance' --> 'Category Review'.
- The 'Category Review' screen will load, displaying:
- A list of top level categories
- The number of subcategories and products within each
- Use the arrow keys or mouse to navigate to the desired category. With the category highlighted, perform one of the following actions:
- Click 'Down' or hit the 'D' key to drill down to the next level.
- Click 'Correct' or hit the 'C' key to edit the category Description or Sort Order.
- Click 'Entry' or hit the 'E' key to create a new category.
- Click 'Remove' or hit the 'R' key to delete the category.
- Click 'Up' to navigate back up a level from a subcategory.
- Use the 'Esc' key to exit Category Review.
- Integrate - 'Product Categories' - Send Changed.

Adding Products to the Web
To Add a Product to a Category:
- Login to PRONTO.
- Navigate to 'Web Site Category / Product Maintenance' --> 'Stockcode Review'.
- Click 'Find' or hit the 'F' key to search for a product by stockcode.
- With the required product highlighted, click 'Correct' or hit the 'C' key.
- In the 'Sort Code' field, enter the sort code of the required category. Alternatively, click the magnifying glass icon to browse to the category.
- Hit 'Enter' to confirm the data entry.
- Repeat Steps 3-6 as required.
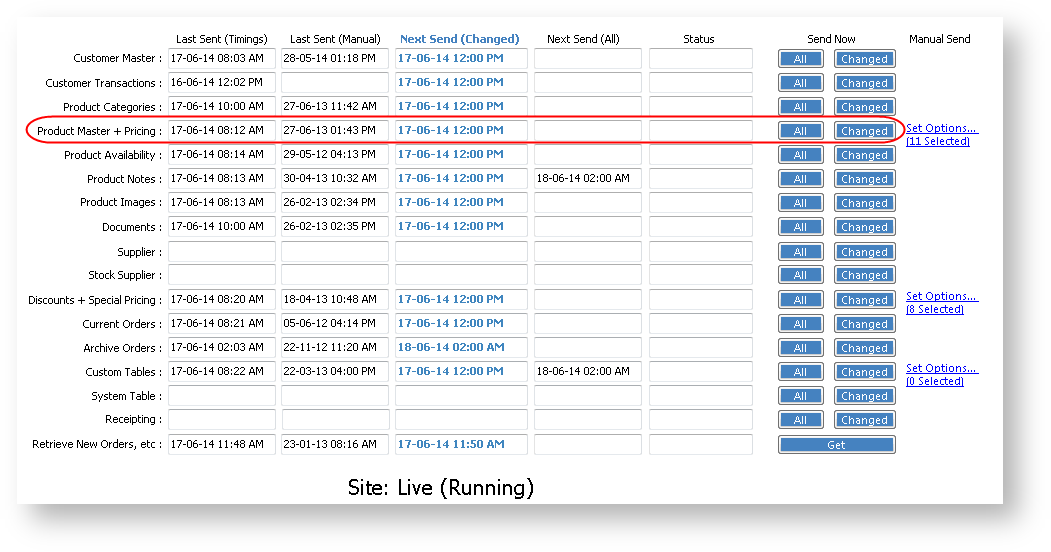
- Integrate - 'Product Master + Pricing' - Send Changed
Updating multiple products
To update multiple products, highlight each product and click 'Mark'. The products will be marked with an asterisk (*) to denote selection.
Once all required products have been marked, click 'Action'. Select action type: 'A' to add a sort code, 'C' to clear an existing sort code, or 'S' to set a new sort code.
The final sort code is comprised of the 'Sort Code' characters from each category level.
In the example below, the sort code 010302 would add a product to the 'Adhesives & Clips' category under 'Office Supplies' --> 'General Stationery'. 
Alternate Categories
Some products are displayed in more than one category. These products have a main category/sort code, and alternate categories/sort codes.
To Add a Product to an Alternate Category:
- Login to PRONTO.
- Navigate to 'Web Site Category / Product Maintenance' --> 'Stockcode Review'.
- Click 'Find' or hit the 'F' key to search for a product by stockcode.
- With the required product highlighted, click 'Alt' or hit the 'A' key.
- Click 'Entry' or hit the 'E' key to add a new category.
- Enter the sort code of the new category.
- Hit 'Enter' to confirm the data entry.
- Repeat Steps 3-7 as required.
- Integrate - 'Product Notes' - Send All.
Product Accessories
Some products are associated with other, accessory products. The grouping of these is known as up-selling.
To Maintain Product Accessories:
- Login to PRONTO..
- Navigate to 'Web Site Category / Product Maintenance' --> 'Stockcode Review'.
- Click 'Find' or hit the 'F' key to search for a product by stockcode.
- With the required product highlighted, click 'Acc'.
- Add a new accessory product by clicking 'Entry' or hitting the 'E' key.
- Correct an existing product by clicking 'Correct' or hitting the 'C' key.
- Remove an accessory product by clicking 'Remove' or hitting the 'R' key; click 'Yes' to confirm removal.
- Repeat Steps 3-7 as required.
- Integrate - 'Product Notes' - Send All.
Product Alternatives
Some products are associated with other, alternative products. The grouping of these is known as cross-selling.
To Maintain Alternative/Cross-sell Products:
- Login to PRONTO..
- Navigate to 'Web Site Category / Product Maintenance' --> 'Stockcode Review'.
- Click 'Find' or hit the 'F' key to search for a product by stockcode.
- With the required product highlighted, click 'Xsell' or hit the 'X' key.
- Add a new alternative product by clicking 'Entry' or hitting the 'E' key.

- Correct an existing product by clicking 'Correct' or hitting the 'C' key.
- Remove an alternative product by clicking 'Remove' or hitting the 'R' key; click 'Yes' to confirm removal.
- Repeat Steps 3-7 as required.
- Integrate - 'Product Master + Pricing' - Send Changed, or for removals, Send All.
Product Notes
Product notes can be added for display on the web. The display method will vary from site to site, and the mapping is generally configured during the Implementation phase.
To Add Product Notes:
- Login to PRONTO.
- Navigate to 'Web Site Category / Product Maintenance' --> 'Stockcode Review'.
- Click 'Find' or hit the 'F' key to search for a product by stockcode.
- With the required product highlighted, click 'Notes' or hit the 'N' key.
- Click 'Entry'.
- Assign a unique sequence number for the note line.This determines the order in which the line appears, relative to the other lines of text.
- Hit 'Enter' or 'Tab' to move to the next field - 'Notational Text'.
- Type the required note text.
- Hit 'Enter' or 'Tab' to move to the next field.
- Repeat Steps 6-9 as required.
- Hit 'Esc' to exit note entry mode.
- Integrate - 'Product Notes' - Send Changed.

Product Keywords
For sites not employing Lucene search, keywords can be assigned to products in order to enhance search results.
To Assign Product Keywords:
- Login to PRONTO.
- Navigate to 'Web Site Category / Product Maintenance' --> 'Stockcode Review'.
- Click 'Find' or hit the 'F' key to search for a product by stockcode.
- With the required product highlighted, click 'Keyword' or hit the 'K' key.
- Click 'Entry'.
- Type the required keyword.
- Hit 'Enter' to confirm the data entry.
- Type the next required keyword, or hit 'Esc' to exit entry mode.
- Repeat Steps 6-8 as required.
- Integrate - 'Product Notes' - Send All.

To add the same keywords to multiple products, try the 'Bulk Keywords' option. Mark the required stockcodes for action by highlighting and clicking 'Mark'. Then click 'BUlk-KW', and enter the required keywords. Select '1GO-Replace' to overwrite or '2GO-Add' to append the existing keywords.
The 'Web-P' and 'Web-C' buttons can be used to call the web page of the highlighted product ('Web-P') or category ('Web-C'). The base URLs must be specified in 'Control Settings' under 'Category URL' and 'Product URL'.

For information on how to configure and maintain product metadata, see Configuring Metadata via PRONTO Web Maintenance.
Related articles