Overview
All pages in the CMS are accessed via the navigation menu, which is located on the left side of the CMS screen. Out-of-the-box, there are standard pages, which are available on all sites. NOTE - What menu items a CMS user can see also depends on the features enabled on the site and their Role permissions.
Sometimes, sites may require access to non-standard pages, e.g., to use a feature that is not automatically configured out-of-the-box. This guide will show you how to add a page to the CMS. Be aware the the page you're adding to the CMS menu will need to exist as a menu item on the CSSADMIN menu first. Otherwise it will not appear in the CMS.
Before you begin, decide where you want to add a link to the page...
The standard navigation menu uses three levels for organisation. The highest level contains three group menus: 'E-Commerce', 'Content' and 'Settings'. Each group has several top level menus under it. Top-level menu items are fly out menus. This means when selected, the top level menu expands to display its menu items. These menu items are page links. For example, to access the 'Roles' page, the user needs to navigate to the 'E-Commerce' group, click 'Users ', then 'Roles'. 
You can add a page link to any existing group and top level menu or create a new group and/or top level menu for it.
Step-by-step guide
To add a page to a CMS group menu:
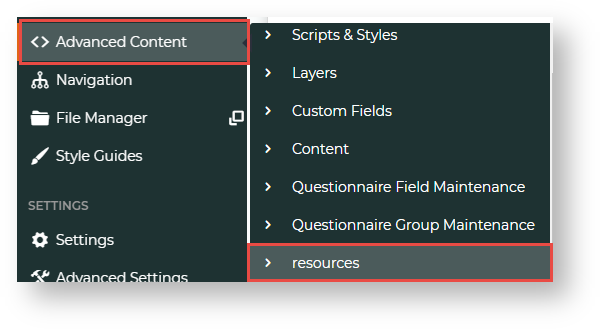
- In the CMS, navigate to Advanced Content → Resources.
- In Resource Maintenance, search for the resource rcCssAdminPageAdditions.
- Click on rcCssAdminPageAdditions.
- To edit the resource, click Modify.
- In Resource Value, add the page name, including the menu structure the resource value will be in. NOTE - Each resource value must be comma-separated. For example, we want to add 'User Imports' to the Users menu, which is in the Ecommerce menu
. Each name in the menu path needs to be separated by a pipe ('|'). So we add a comma after the last entry, then 'ECommerce|Users|User Imports|zUserImport.aspx?mode=admin'
.
- To save the changes, click OK.
- Refresh the Dictionary for 'System Control'. (For a guide on refreshing the dictionary, see Cache Refreshing.)
- The page will now appear in the CMS menu. Here is our example.


Alternatively, you may specify the menu item the page should appear under, instead of having the new page go to the 'Other' menu by default.
- Login to the CMS.
- Navigate to Advanced Content → Resources.
- Search for the resource 'rcCssAdminPageAdditions'.
- Edit the resource and enter the page information as follows, separated by pipe ("|"):
- Group Name (e.g. ECommerce, Content, or Settings)
- Top Level / Flyout Menu Name (e.g. Users, Products & Categories, Reporting, etc).
- Menu Label (the page name the user will see)
- Page Name (e.g. Dictionary.aspx, UserMaintenance.aspx?mode=admin)
- For example: ECommerce|Users|Advanced User Maintenance|UserMaintenance.aspx?mode=admin
- Save.
- Refresh the Dictionary for 'System Control'.
- The page will now appear in the menu you specified.


In this example, 'Dictionary' will appear in the 'Other' menu, 'Test Email' will appear under eCommerce → Reporting, and 'Advanced User Maintenance' will appear under eCommerce → Users.

Related help